
ou can open your Bookablesites booking website in two simple ways:
- From the Admin Dashboard:
Click the “Booking Website” button located in the upper-left corner of your admin panel. Your booking site will automatically open in a new browser tab. - From the Customize Page:
- Copy Website URL: Selecting this option copies your website link, allowing you to paste it directly into your browser or share it.
- Go to Website: Choosing this option opens your booking site instantly in a new tab.
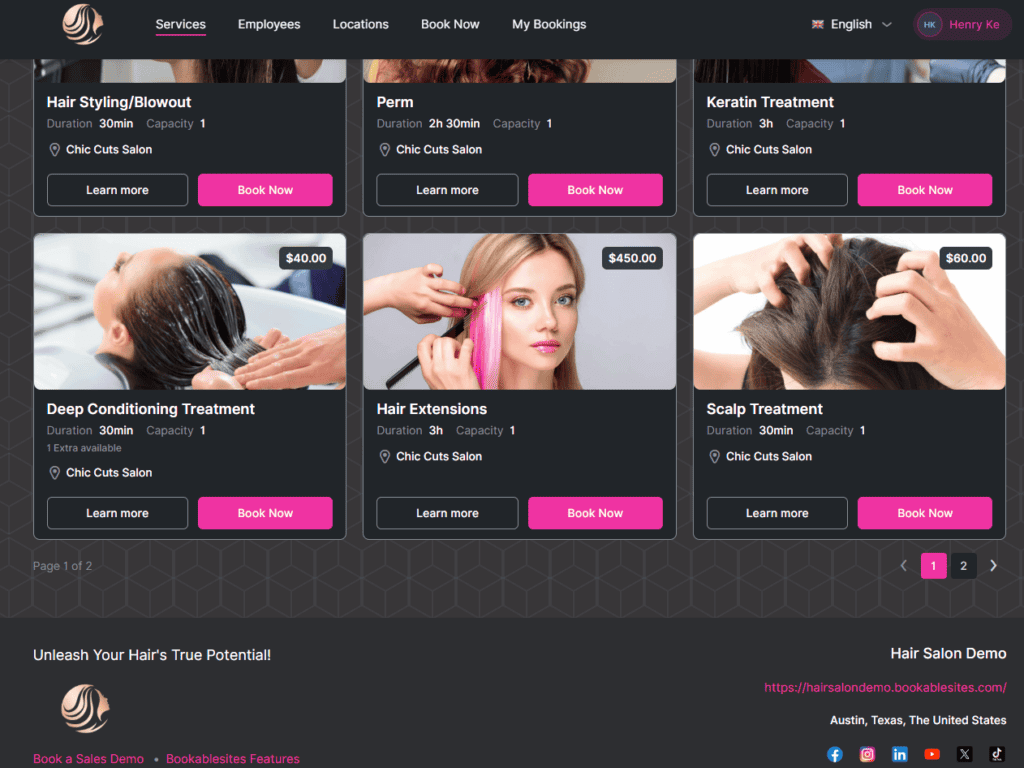
When you first visit your Bookablesites booking site, you’ll arrive on the Services Page. Here, customers can browse all available services—each displayed with details such as the service image, name, badge, extras, duration, location, price, and capacity.
The listed duration represents only the base service time and does not include additional extras. Prices reflect both the service rate and any individual employee pricing. If employee prices differ, the system will display “From [lowest price]” to indicate the starting rate.
Customers can click “Learn More” to view a full service description and explore available extras before completing their booking, ensuring they have all the details they need.
Visitors can refine their search using filters for categories, employees, and locations. They can also sort results by price (low to high or high to low), popularity, or name (A–Z or Z–A). A search bar is also available for quick access to specific services.
The footer of your booking website displays information defined within your Customize → Layout Settings → Footer Section, giving you control over what business details appear at the bottom of your site.
Learn More
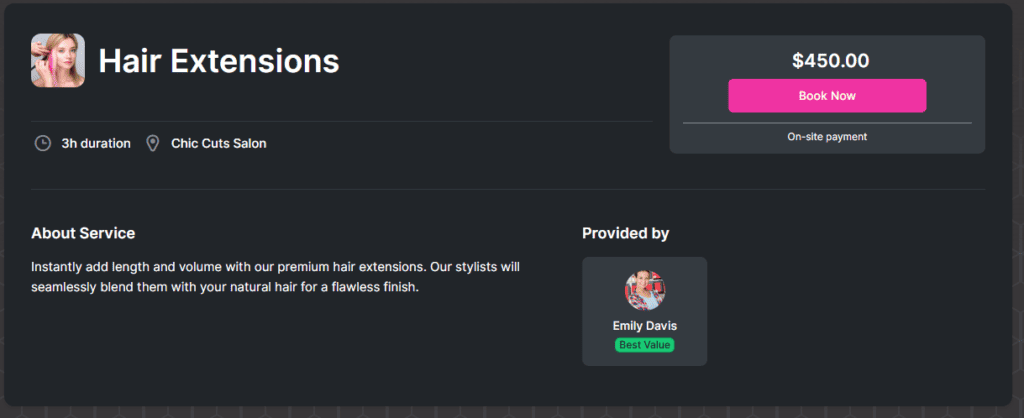
On your Bookablesites booking website, the “Learn More” page provides customers with a detailed view of each service. This section displays the service name, duration, location, available extras, assigned employees, and a comprehensive service description.
If online payment options are available, the logos of supported payment providers will appear just below the “Book Now” button, helping customers quickly identify their preferred payment method.
When a service is offered at multiple locations, the “Book Now” button becomes interactive. Clicking it will open a list of all locations where that particular service is available, allowing customers to choose the one most convenient for them..
The footer of the page will display the information you choose to display. You have the option to choose between 2 or 3 columns for your footer layout. To make this adjustment, and to define the information that will be shown, navigate to the “Footer Section” in the admin section’s Customize page.
Booking an Appointment
When customers visit your Bookablesites website, they have two convenient ways to begin the booking process:
- Using the “Book Now” Button in the Top Navigation
Visitors can select the “Book Now” option from the top menu.- If multiple categories exist, they’ll first choose a category, then pick their desired service.
- The number of available services is shown next to each category.
- After selecting a category, the “Choose” button activates beside each service.
- Clicking “Choose” starts the booking flow for that particular service.
- “Book Now” Button Beside Each Service
Alternatively, customers can click “Book Now” directly next to a specific service displayed on your website’s main page. This action instantly launches the booking process for that service. The Bookablesites booking form will then follow the sequence you’ve configured under Customize → Look and Feel → Layout Settings.
These flexible options make it simple for customers to find and schedule the services they need with just a few clicks.
If your setup includes Extras for certain services, these will appear at the beginning of the booking steps. Customers can view the duration, price, and description of each extra, helping them decide if they’d like to add additional options to their appointment.
When a customer adds an Extra to their booking (based on the quantity limits you’ve set), the price and duration of the appointment automatically update in the panel on the right-hand side. This feature ensures customers always see the correct total before moving forward. After reviewing the updated details, clicking “Continue” will advance them to the next stage of the booking process, which may differ depending on your configuration.
By default, customers are given the option to choose their service provider, unless you’ve turned off this feature in the Customize settings. This gives customers the flexibility to select their preferred employee when multiple staff members offer the same service.

Beneath each employee profile, customers can view the employee’s description (if provided) along with the next available appointment slots. This layout helps streamline the booking experience by displaying convenient scheduling options right away. If any of the suggested times fit their schedule, customers can book immediately. Otherwise, they can click “Choose” beside an employee’s name to select their preferred provider and move forward to the next step.
By default, the following step involves selecting the location where the chosen employee offers that particular service. This step appears when multiple locations are assigned within the employee’s Working Hours settings.
Important:
If your business operates across multiple locations, ensure each employee has a default location set in their profile. Any additional locations they cover should be configured within their working hours. Bookablesites allows you to assign different locations per day, per time block, or even combine multiple locations within a single working period.
This setup is particularly useful for remote or online appointments via Zoom, Google Meet, or Microsoft Teams, where the physical location is less relevant to the employee’s availability.
If your business operates from multiple physical locations, you can set up each address in the “Locations” section of your Bookablesites admin panel. The built-in Google Maps integration helps you pinpoint and confirm the correct address with ease. Once these locations are configured, customers visiting your booking site will be able to select their preferred location for an appointment. By clicking “Choose,” they can confirm their selection and continue to the next step in the booking process.
When the selected service is configured as a Group Service, the next step allows customers to define the number of participants. They can either schedule the appointment just for themselves by choosing “Just Me” or add additional participants using the “Choose Number of People” option.
Within this field, customers can specify the total number of attendees. The maximum group size depends on both the service and the assigned employee’s capacity. Once that limit is reached, the “+” button will be disabled. The minimum allowed number of participants will also be displayed for reference.
Important Note:
The Group Booking option is a custom feature that counts toward your Custom Features & Integrations limit. It must first be enabled under Features & Integrations before you can activate it for a service.
Any extra participants added through this option are displayed only as part of the total number of attendees—their individual personal details are not collected during the booking process.

After choosing the number of participants, customers can click “Continue” to move on to the next part of the booking flow.
In this example, the next step is selecting the Date and Time. By default, Bookablesites displays the first week with available time slots for the selected employee. Beneath the calendar, customers can view all available time options for the chosen date.
To browse other weeks, they can use the arrow icons (< and >) located above the calendar. If they wish to book further in advance, they can switch to the Monthly View to quickly find a future date.
Important Note:
If the “Show Time Zone Option to Customers” setting is enabled under the Customize section, Bookablesites will automatically detect the customer’s time zone based on their device’s location and display the corresponding times.
If this option is disabled, appointment times will appear based on the default time zone set in your Bookablesites admin panel. Customers won’t see any time zone information on the booking page, so it’s best to disable this setting only if your services are offered exclusively within a single time zone.
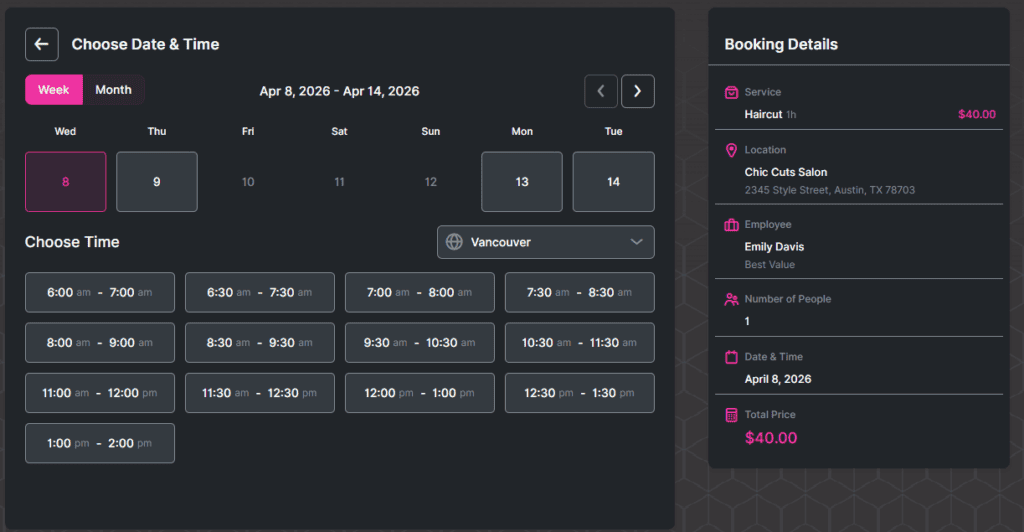
Once a customer selects a time slot, it will be automatically highlighted, and the form will move forward to the next stage. If you’ve enabled the Recurring Appointments option in Bookablesites, this becomes the next step. This functionality lets customers easily schedule ongoing appointments. You can specify how many recurring sessions can be booked in each cycle, set the recurrence pattern (daily, weekly, or monthly), and choose the interval (such as once per week, every three weeks, or every two months).
Please note:
The Recurring Appointments function is an optional feature that must first be activated in the Features & Integrations section before it can be customized within the Service settings.
Once enabled, the Date & Time step will automatically occupy the fifth position in Customize → Look and Feel → Layout Settings. This arrangement ensures that Bookablesites collects all the required details beforehand so it can properly generate recurring time slots.
You can also define how payments for recurring bookings are processed. Customers can either be required to pay for the entire series of appointments upfront when making the initial booking or pay only for the first session, with the remaining payments handled later — either in person or through the secure Payment via Link option for online transactions.
When customers click Continue, they’ll see a summary of all scheduled sessions, including the first and subsequent recurring appointments. If any chosen time slots are unavailable due to existing bookings, calendar blocks, or scheduled days off, Bookablesites will automatically reschedule those sessions to the nearest available date and time according to the recurrence rules you’ve set in the Service Settings.
Additionally, customers can modify or remove specific sessions by hovering over each displayed time slot and adjusting the details as needed.
The following stage is the Customer Info section, where visitors provide their personal details, including First Name, Last Name, Email, and Phone Number. The first and last name fields are required, while the email and phone number fields can be set as optional or hidden according to your preferences in the Customize settings.
If you’ve included Custom Fields for any of your services, those will appear beneath the standard customer information fields. When both guest and registered users are allowed to book, an additional option to automatically create an account will be shown below the customer details.
At the top of the booking form, two tabs will be available: Customer Info (the step currently in progress) and Existing Account, where returning customers can sign in to continue their booking as registered users.
After all required fields are completed, customers can click Continue to move forward to the next step of the booking process in Bookablesites.
If your system is configured to accept only On-Site payments — meaning no online payment methods are set up — this will serve as the final step in the process, and the “Continue” button will be replaced by “Book Now.”
However, when multiple payment options are available, the form will proceed to the last stage — the Checkout step.
During the Checkout stage, customers will see all the payment methods you’ve enabled for that particular service in the Service Settings, allowing them to select their preferred option.
If the Coupons feature has been activated in the Features & Integrations section, and a coupon applies to the selected service, a Coupon field will appear as well. Customers can then input their code to redeem discounts previously configured in the Finance section.
On the right-hand panel, customers can review a summary of their booking — including the service name, appointment date and time, location, recurrence details (if applicable), any selected Extras, and other relevant information. This allows them to confirm that all details are accurate before finalizing the reservation by clicking “Book Now.”
All of this functionality is seamlessly managed within Bookablesites.
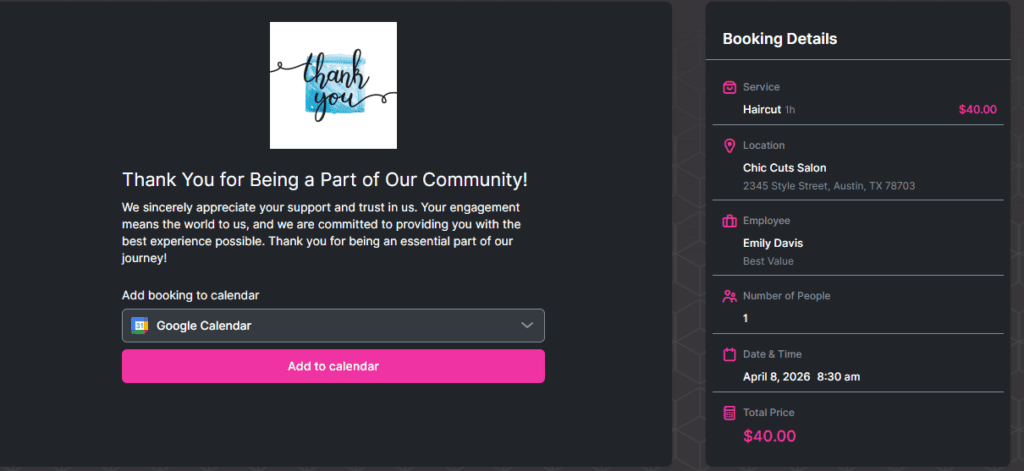
The last step of the booking process in Bookablesites is the “Congratulations” screen. On this page, customers will see a confirmation message featuring either the default Thank You image, title, and description or any custom visuals and text you’ve set up in the Customize section.
From this screen, customers can also add their appointment directly to their personal calendar by choosing Google, Outlook, Yahoo, or iCal Calendar.
This built‑in calendar feature is especially helpful if external integrations like Google, Outlook, or Apple Calendar haven’t been configured in your account, as it still lets users save their appointment details quickly. However, only key booking information—such as the service name, appointment date, time, and location—will transfer to the calendar entry. Extra details like add‑ons, custom fields, or special notes will not be included.
If you have set up email notifications, once the customer reaches the “Thank You” page, notifications will be automatically sent to both the customer and the employee. These notifications will include all the relevant appointment details, which are added through the use of placeholders in your email templates. This ensures that both parties receive all the necessary information about the booked appointment.