
Sync Bookablesites appointments with your Outlook Calendar to keep your timetable coordinated. The Outlook integration prevents double bookings by automatically adding Bookablesites appointments to Outlook and blocking any Outlook time slots marked as busy in Bookablesites. Changes made in Outlook — such as rescheduling or deleting an event — will be reflected in Bookablesites so both calendars stay aligned.
The Outlook Calendar and Microsoft Teams connector for Bookablesites is a premium integration and counts toward your total Custom Features & Integrations.
Activating and Configuring the Google Calendar Synchronization
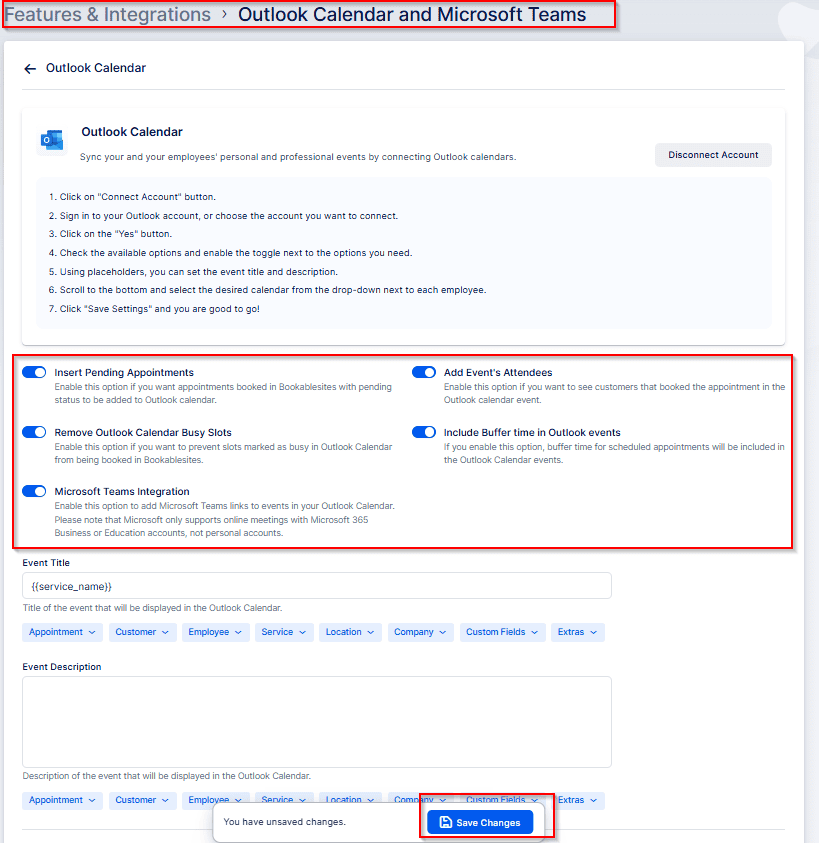
To enable synchronization, go to Features & Integrations in your Bookablesites account, find “Outlook Calendar and Microsoft Teams,” and click the “Enable” button.
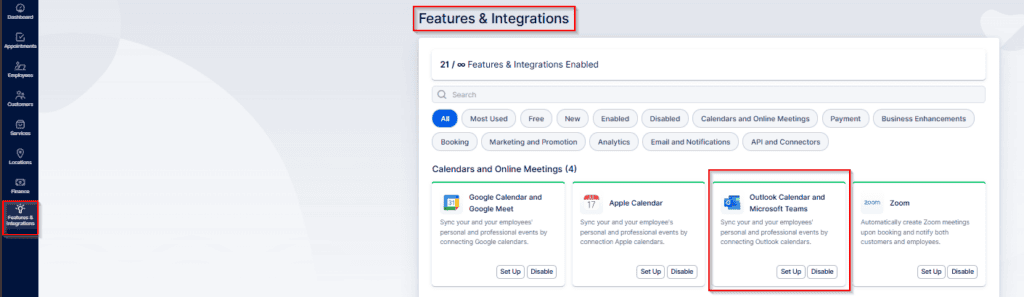
After enabling the integration, the card will reload and display a “Set Up” button. Click that button to open the configuration page for the Outlook Calendar and Microsoft Teams integration in Bookablesites.
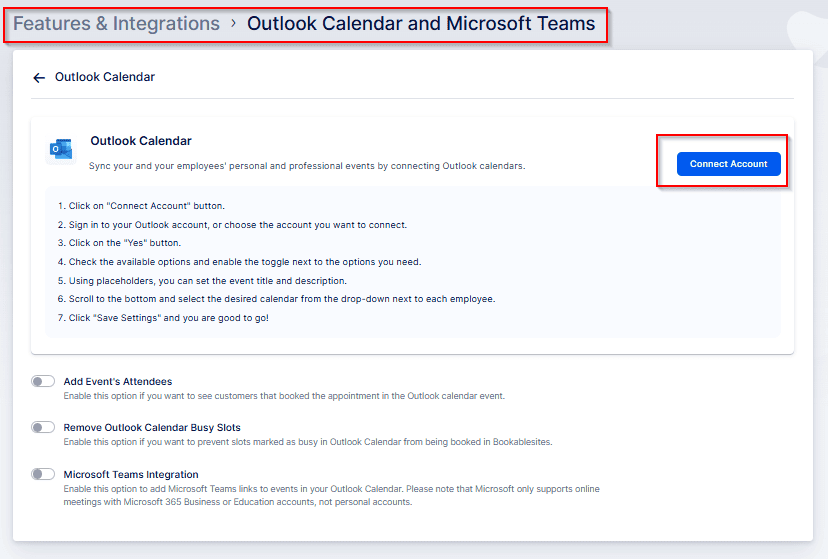
When you open the Outlook Calendar and Microsoft Teams integration page for the first time, the initial screen (shown above) provides brief guidance on connecting your account. Depending on your organization, there are two ways to configure this integration:
- Link the Main Account: Use the “Connect Account” button in the top-right corner to link the primary (admin) Outlook account to Bookablesites. After connecting, you can select calendars from that Outlook account and assign them to employees, who will appear under the Event Title and Event Description sections.
- Link via Account Settings: Alternatively, you can leave the main account unconnected and have users link Outlook accounts individually from Account Settings. Each employee may add up to six Outlook accounts and choose multiple calendars from them; those calendars can then be used to block availability in Bookablesites.
Either approach supports connecting multiple calendars per user.
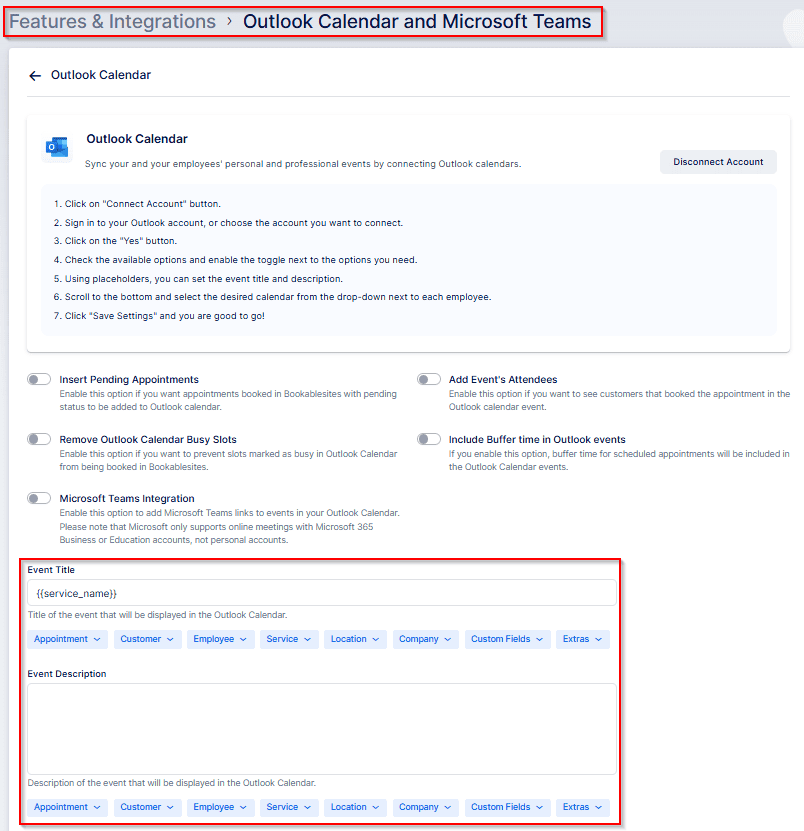
At first, only three toggle options are visible (“Add Event’s Attendees,” “Remove Outlook Calendar Busy Slots,” and “Microsoft Teams Integration”). After an account is linked, two more options appear (“Include Buffer Times in Outlook events” and “Insert Pending Appointments”).
Before walking through each method in detail, review the settings that control how Outlook synchronization behaves:
- Insert Pending Appointments: Disabled by default; when enabled, appointments with a Pending status will be inserted in addition to Approved ones.
- Add Event’s Attendees: Useful for group bookings — it adds all customers as attendees on the Outlook event. Note: Outlook invitation emails are sent only if this option is enabled.
- Remove Outlook Calendar Busy Slots: Blocks times marked as busy in Outlook so they cannot be booked in Bookablesites.
- Include Buffer Time in Outlook Events: Determines whether buffer periods before/after appointments are included in the event visible to attendees.
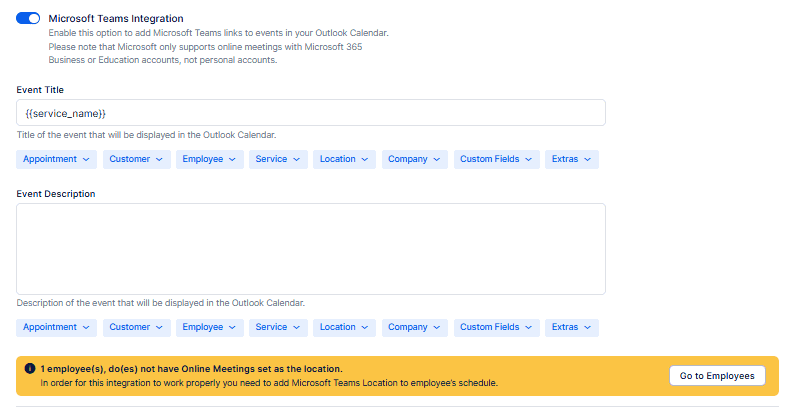
- Microsoft Teams Integration: When turned on, Bookablesites will add a Teams meeting link to appointments for employees connected to Microsoft. These appointments may then be scheduled as online meetings.
Note: Bookablesites supports personal Microsoft account connections, but Microsoft Teams meeting creation is not available on personal accounts. To use Teams links automatically, connect a Microsoft 365 Business or Office 365 Education account.
Event Title and Event Description
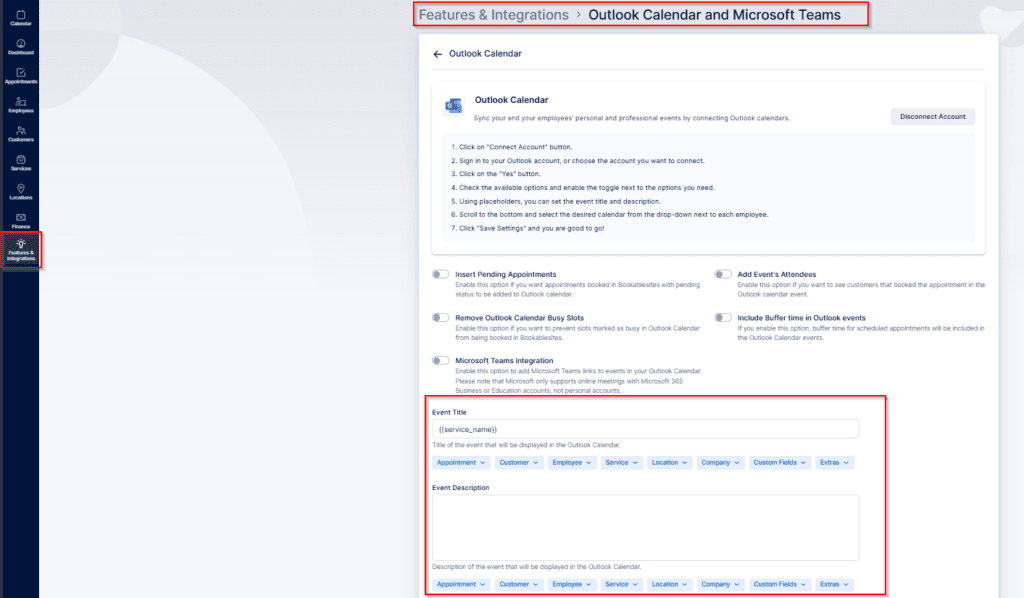
These settings let you control the text shown in Outlook events created from Bookablesites appointments by combining static text with placeholders.
- Event Title: Click inside the “Event Title” field, then use the dropdown below to pick which placeholders or data to include. The {{service_name}} placeholder is added automatically, but you may insert custom text and other placeholders as needed.
- Event Description: Click the “Event Description” field and choose items from the dropdown to populate the description. This field is empty by default, giving you flexibility to add relevant details or placeholders.
Placeholders automatically insert booking information into the title and description, enabling concise, informative event entries.
Linking the Main Account
Connecting the primary Outlook account works well for sole proprietors or organizations that centralize staff calendars in a single Outlook account. After you link the main account on the Outlook Calendar settings page, every employee you’ve created will appear under the Event Title and Event Description sections.
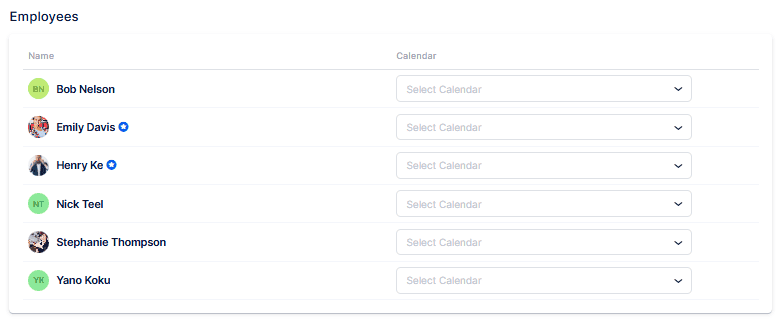
The image above shows three distinct employee connection states with Outlook Calendar:
- “Mike Peters” is not connected to any Outlook account.
- “Employee Example” is linked via the Outlook Calendar integration page.
- “John Doe” is connected to his personal calendar through Account Settings.
Right after an account is linked, every employee appears under the Event Title and Event Description sections with an empty dropdown next to their name, as shown for “Mike Peters.”
If you assign a calendar to an employee, the dropdown expands to list all calendars from the Outlook account connected to Bookablesites. Assigning one of those calendars to an employee is illustrated by “Employee Example.” After an employee is linked this way, they cannot connect a personal Outlook account via Account Settings/Integrations; attempting to do so will display a notification.
This notification informs the employee that an admin has linked their profile to one of the Outlook calendars in the admin’s account. Consequently, the “Connect Account” button will be unavailable to that employee. If the employee needs to connect their own Outlook account, the admin must return to the Outlook Calendar and Microsoft Teams integration page, open the dropdown next to that employee, click the “X” to remove the assignment, and save the changes. After that, the employee will be able to log in to their calendar.
Allowing the employee to sign in (as with “John Doe” in the example) effectively achieves the same result as the “Linking via Account Settings” method. Continue below for instructions on that process.
Linking via Account Settings
The “Overridden by Employee” label (shown next to “John Doe” in the example) means the employee connected their Outlook account through Account Settings rather than via the Outlook Calendar and Microsoft Teams integration page. This option lets employees manage their own calendar connections even if an admin initially linked the main account, since admins typically do not have employees’ personal Outlook credentials.
To enable an employee to log in to Bookablesites after their account is created by an Admin or Superadmin, follow these steps:
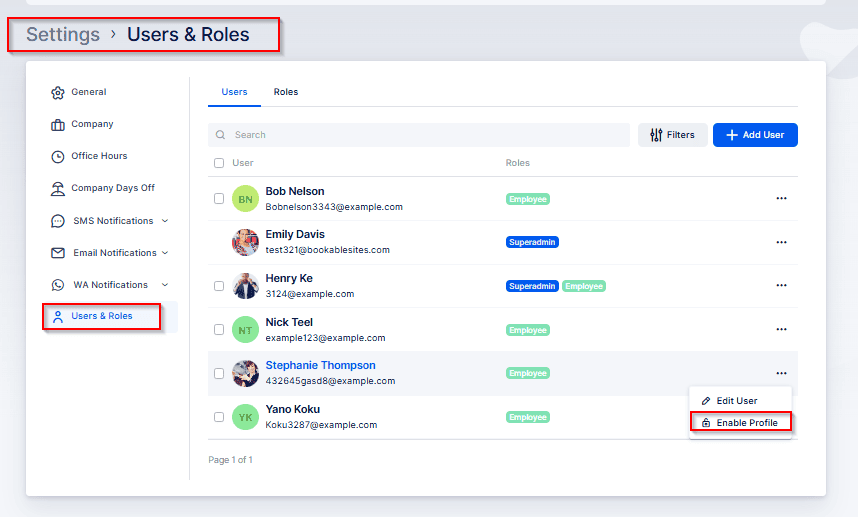
- Go to Settings (bottom-left of the admin page).
- Select Users and Roles.
- Find the employee, open the three‑dots menu next to their name, and choose Enable Login.
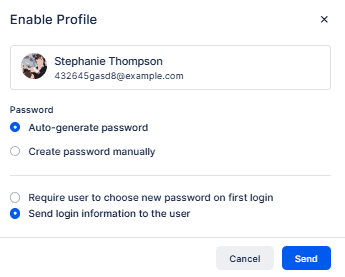
A new popup will let you decide if Bookablesites should automatically generate a password or if you want to set one yourself for this employee. You can also specify whether the employee must change the password at first login or if you will simply send them the login credentials.
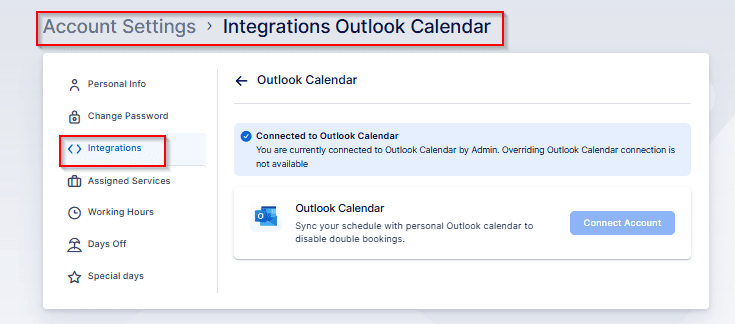
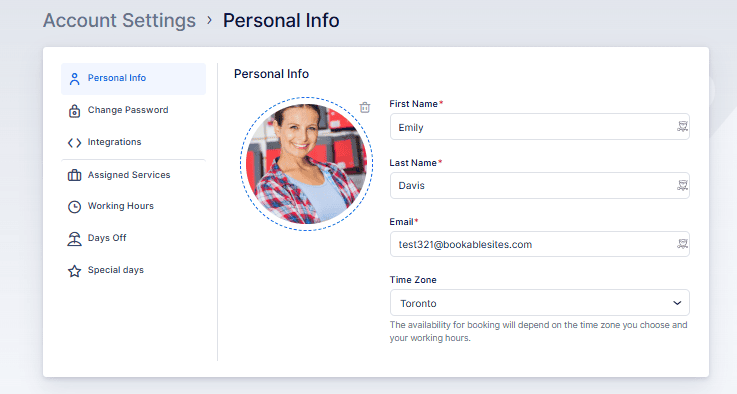
After receiving their credentials, the employee can sign in to their Bookablesites account. They should go to Account Settings to connect their Outlook account to their employee profile.
To open Account Settings, click the user name in the top-right corner.

This will open a new window where the signed‑in employee can update their profile information, change their password, and edit their schedule (if their role allows). For this integration, they should go to the Integrations area and sign in to their personal Outlook account.
To reach Integrations, click “Outlook Calendar.”
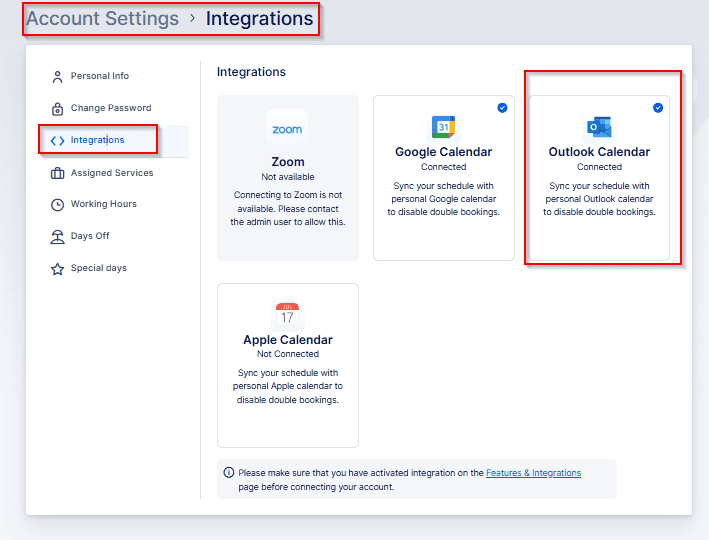
In Integrations, select “Connect Account.” Bookablesites will send you to the Outlook sign-in page to choose your Outlook account. After selection, Outlook will show a permissions prompt — you must grant the requested permissions to complete the connection.
When Bookablesites gains access, you will return to Account Settings > Integrations and see your account listed as connected. The available options include:
- Add Another Account: Employees may link multiple Outlook accounts (up to six) so they can pick calendars that should block availability in Bookablesites.
- Sync with: Designate a single calendar where Bookablesites will create all appointments. Only one calendar can be used for syncing appointments.
- Block time from calendars: Choose one or more calendars whose busy slots will prevent bookings in Bookablesites. You can add up to six calendars by clicking “Add Calendar” — for example, both work and personal calendars can be added so busy times from both block availability.
- Insert Pending Appointments: This is not applied automatically from the global Outlook settings; the employee must decide whether pending Bookablesites appointments should be inserted into their Outlook calendar.
- Include Buffer time in Outlook events: This setting is configured per employee and controls whether buffer periods are added to Outlook events created by Bookablesites.
- Event Title and Event Description: These fields do not inherit the global configuration; employees must set their own event title and description formats here.
Don’t forget to click “Save” to apply your changes.
Microsoft Teams
Enable Microsoft Teams at the global level first: go to Features & Integrations -> Outlook Calendar and Microsoft Teams -> Set Up, then locate and turn on the “Microsoft Teams Integration” toggle.
After activation, Bookablesites may show a yellow warning above the employee list if some staff connected to Outlook have not configured Online Meetings as their location. Click “Go to Employees” to open the Employees section and address those settings.
In the Employees area, find the staff member you want to modify, open the three‑dots menu and choose Edit Employee. In their profile, update the default location and select “Microsoft Teams” as the location for online meetings.

Setting an employee’s default location to “Microsoft Teams” does not by itself enable bookings via Teams. You must also confirm their Working Hours and the service location settings.
Working Hours: Open the employee’s profile, go to the “Working Hours” tab, and review their schedule. If you assigned specific locations within individual working periods, update those entries so they include Microsoft Teams where appropriate. Here is an example:
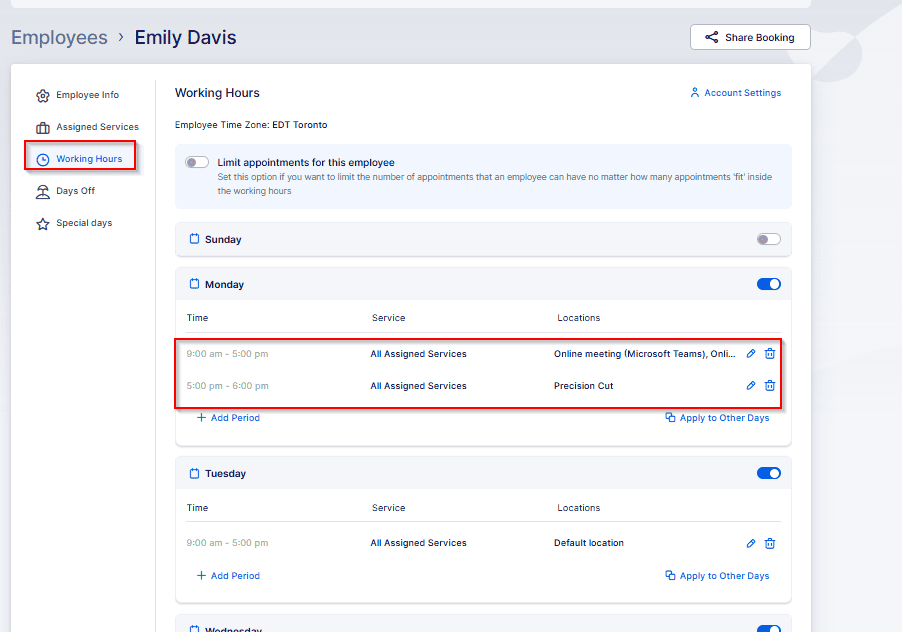
In this example, the employee covers the Default Location (which may not be Microsoft Teams depending on your setup) on Mondays from 08:00–13:00, then works exclusively via Microsoft Teams from 14:00–17:00 (so Microsoft Teams remains available even if the default location changes), and finally serves two physical locations from 17:00–19:00. As shown above, you can assign multiple locations within a single working period and create separate periods so the employee operates at different sites at different times.
Because Tuesdays do not include Microsoft Teams in this schedule, the Teams option won’t be available on that day unless the employee’s default location is set to Microsoft Teams.
Now confirm the services you want to offer through Microsoft Teams are configured correctly.
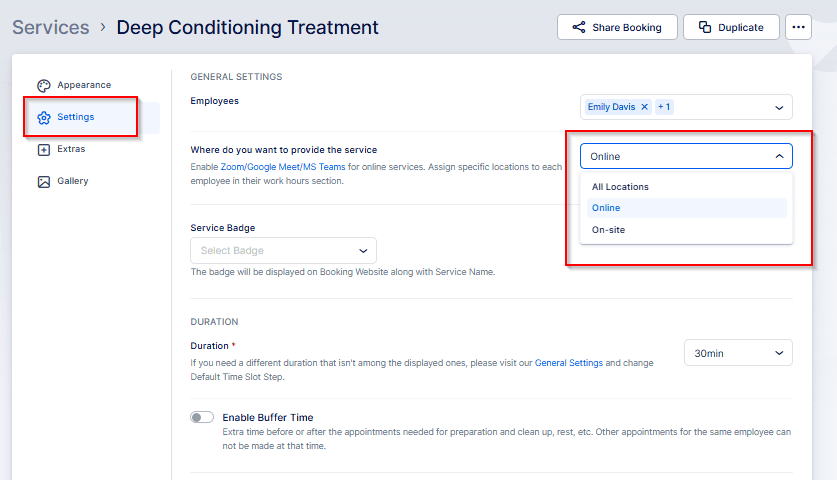
Services: Open the Services section and edit the service you want to offer via Microsoft Teams. In the service details, select the “Settings” tab on the left and review the “Where do you want to provide the service” option.
- Choosing “Online” or “All Locations” enables appointments for that service to be held via Microsoft Teams. Selecting “On‑Site” restricts the service to physical locations and prevents Teams bookings.
After confirming the employee’s working hours and that the service is available, you can start using Microsoft Teams for appointments.
New bookings will automatically generate a unique Microsoft Teams meeting link; group appointments will share the same link for all attendees.
Key Points to Remember
This completes the Outlook Calendar and Microsoft Teams integration overview. Important details to note:
- Outlook Calendar will only block time in Bookablesites if the external event is marked as Busy. If a slot isn’t being blocked, confirm the event is pulled from the correct calendar and change the Outlook event status to Busy if needed.
- A connection made via the global Outlook Calendar page cannot be overridden from Account Settings.
- To link multiple Outlook accounts, users must connect them through Account Settings.
- Only one Outlook calendar can be designated to receive appointments created by Bookablesites, but up to six calendars may be selected to block availability.
- Global Event Title and Event Description settings do not carry over to an employee’s Account Settings; each employee must configure their own title and description.
- New appointments are added to the connected Outlook calendar going forward (both online and offline). This is not retroactive — bookings made before the connection will not be added automatically. Because Bookablesites supports two‑way sync, opening and saving an existing appointment (without changing it) will add it to Outlook.
- If an employee deletes the Outlook event that was created from a Bookablesites appointment, the appointment status changes to “Rejected” and triggers the “Appointment Rejected” notification (if enabled).
- If an employee moves the Outlook event created from a Bookablesites appointment, the appointment will be rescheduled in Bookablesites and the “Appointment Rescheduled” notifications will be sent (if enabled).
- Updates made in the admin area of Bookablesites will be reflected in the corresponding Outlook events.
- The Calendar section in Bookablesites can display Outlook events. Open Calendar, select the Options dropdown, and choose “Show Outlook Calendar Events” to view them (they display the Outlook icon in the corner).