
Activating and Configuring
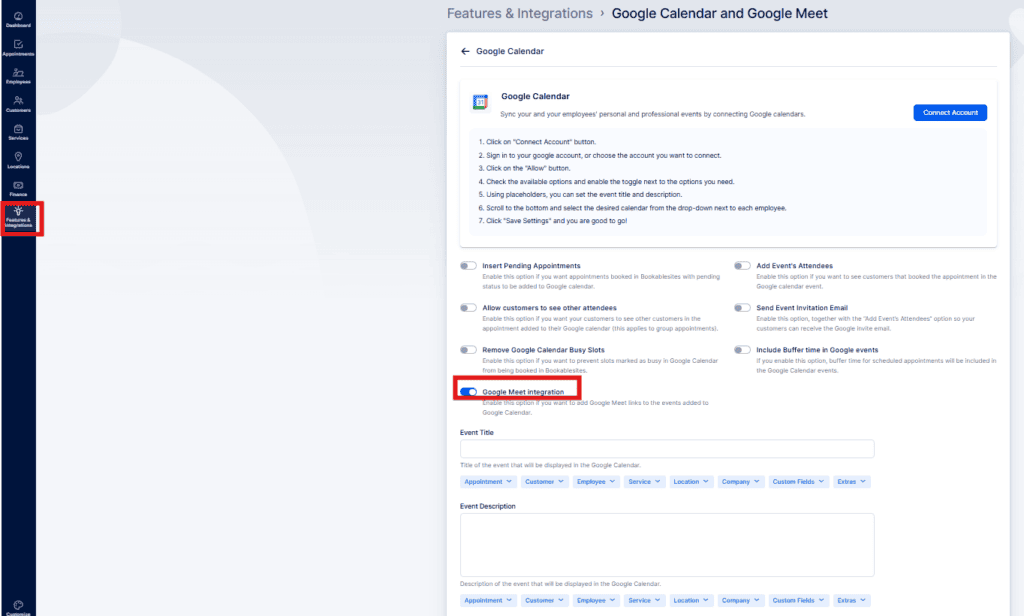
To activate this option, go to the Features & Integrations section in Bookablesites. Find the “Google Calendar and Google Meet” integration, and turn it on by clicking the “Enable” button.
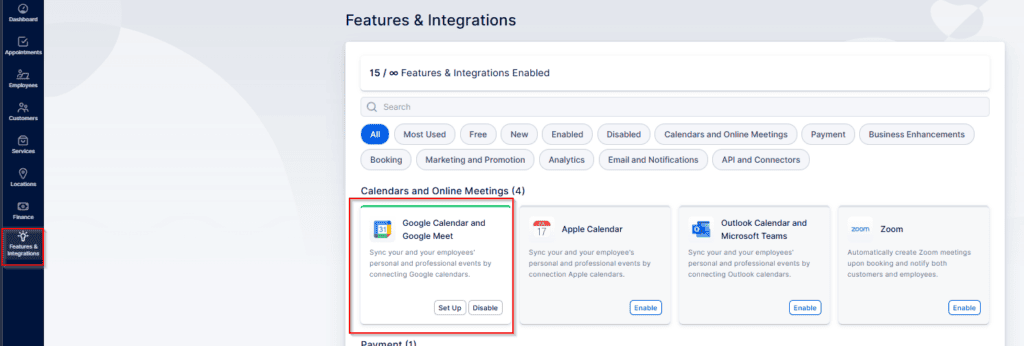
after activation, the card will reload and show a “Set Up” button. Select this button to open the configuration page for Google Calendar and Google Meet in Bookablesites.
You can connect Bookablesites with Google Calendar in two ways:
- Connect the Main Account:
Link the admin’s Google account and assign calendars from that account to specific staff members. - Connect via Account Settings:
Staff members link their own Google accounts through their Account Settings. Each person can connect up to 6 Google accounts and choose multiple calendars to control their availability.
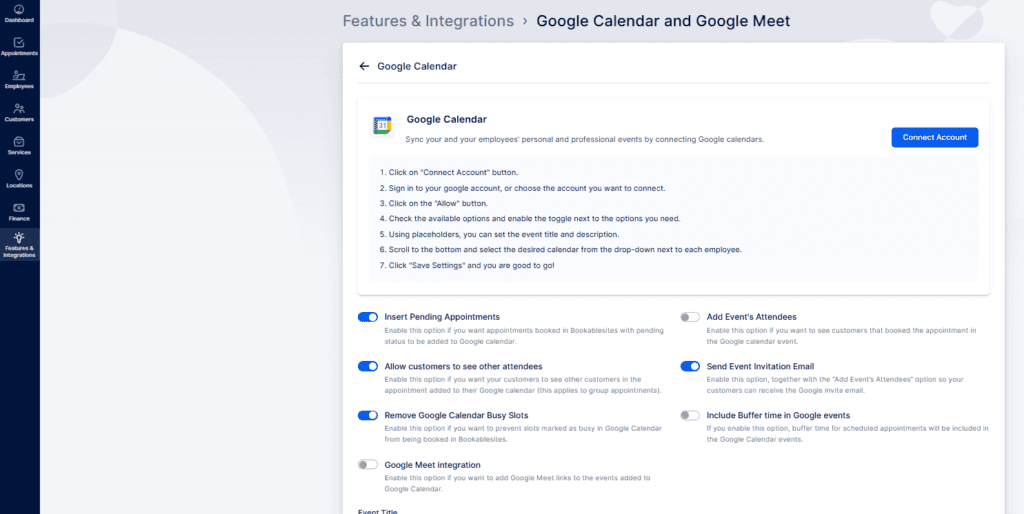
With either option, selected calendars can be used to block availability, and a single calendar can be designated to store Bookablesites appointments. The main configuration options include:
- Insert Pending Appointments: Places appointments that are not yet approved into the calendar.
- Add Event’s Attendees: Adds all booked customers to the Google Calendar event, which is helpful for group bookings.
- Allow customers to see other attendees: Lets customers view the names of others in the same group appointment. This is off by default for privacy.
- Send Event Invitation Email: Sends a standard Google Calendar invite email in addition to Bookablesites notifications.
- Remove Google Calendar Busy Slots: Uses “busy” times from Google Calendar to block booking slots and avoid double booking.
- Include Buffer time in Google Events: Optionally adds buffer time before or after appointments in the Google Calendar event.
- Google Meet Integration: Automatically attaches a Google Meet link to appointments when this option is active.
Event Title and Event Description
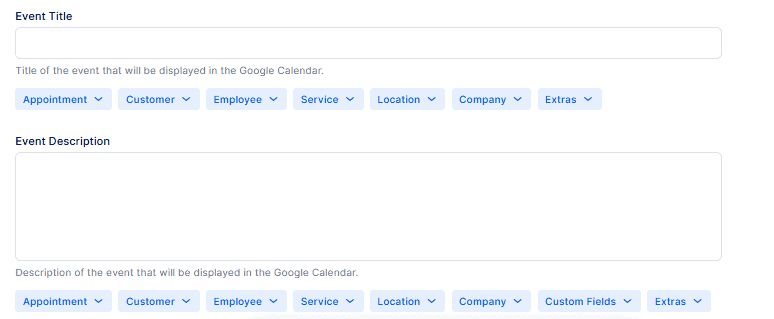
You can adjust how Google Calendar events created from Bookablesites bookings are displayed by using plain text along with placeholders such as {{service_name}}. By default, the event title uses the service name, and the description is empty.
- Event Title:
Click inside the “Event Title” field, then use the dropdown below it to choose what information should appear in the title. The {{service_name}} placeholder is included automatically, but you can add your own text and insert other placeholders as needed. eg. {{service_name}} with {{customer_first_name}} - Event Description:
In the same way, you can edit the “Event Description” field. Click inside the field and pick the details you want from the dropdown. Since the description starts out blank, you can define exactly what information will be shown there. Example shown below
- Date: {{appointment_start_date}}
- Time: ((appointment_start_time}}
- Customer: {{customer_first_name}}
Placeholders let you automatically pull booking details into the event title and description. This helps you generate clear, informative events that show key information right away.
Linking the Main Account
This option is ideal when all staff calendars are controlled through a single Google account. Once the admin’s account is connected, each employee is listed, and you can assign specific calendars to them.
The image above illustrates three different connection statuses between employees and Google Calendar:
- “Mike Peters” is not connected to any Google account.
- “Employee Example” is connected via the Google Calendar integration screen.
- “John Doe” is connected to his own Google Calendar through Account Settings.
By default, after a Google account is connected, all employees are listed under the Event Title and Event Description sections with an empty dropdown next to their names, as shown for “Mike Peters” in the example.
When you assign a calendar to an employee, the dropdown opens and displays all calendars available in the Google account previously connected to Bookablesites. Selecting one of these calendars for an employee, as shown for “Employee Example,” links that employee to that specific calendar. After an employee is connected this way, they will no longer be able to connect a personal Google account on their own.
When a calendar is assigned to an employee through Features & Integrations, they are prevented from linking their own Google account from Account Settings. If the employee needs to use their personal account instead, the admin must first remove the assigned calendar by clicking the “X” next to the employee’s name and saving the changes.
Allowing an employee to sign in and connect their own calendar (such as “John Doe” in the example) is essentially the same as using the “Linking via Account Settings” method described below.
Linking via Account Settings
Employees can independently connect their Google calendars from within their Account Settings. This approach is helpful when they work with several calendars or prefer not to rely on a calendar assigned by an admin.
If “Overridden by employee” appears next to an employee’s name in Features & Integrations, it indicates that the employee has connected their own Google account. In this situation, admins cannot assign a calendar to that employee unless the employee first disconnects their personal integration.
To allow employees to sign in to Bookablesites and connect their own accounts, follow these steps:
- Go to Settings > Users and Roles > Users.
- Locate the employee, open the menu next to their name, and select “Enable Login.”
- Create or generate a password and share the login information with them.
(You can also do this from the Employee tab.)
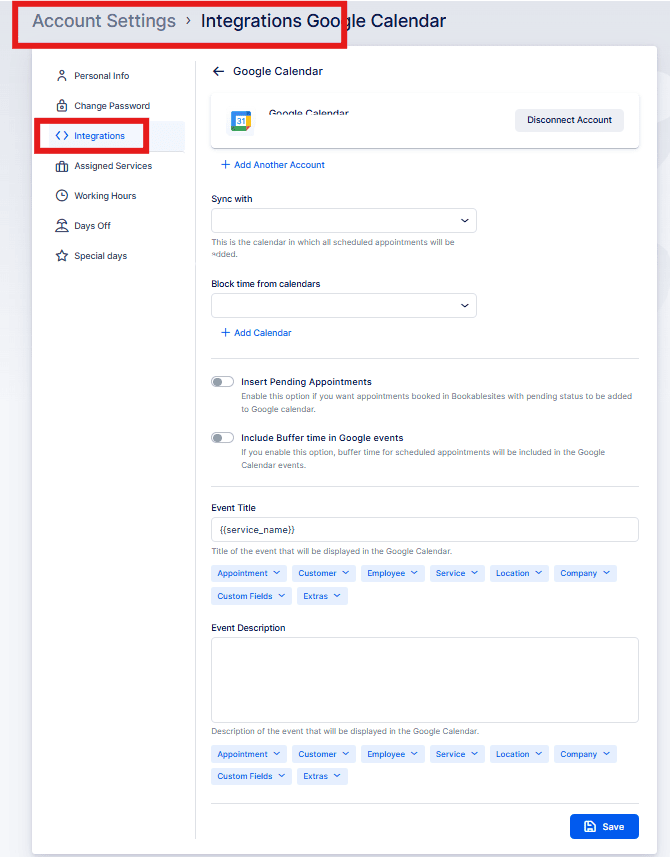
After logging in, the employee can connect their Google account by going to Account Settings > Integrations > Google Calendar.
This action opens a new window where the signed-in staff member can edit their profile details, update their password, and adjust their working hours if permitted by their role. Most importantly for this setup, they can go to the Integrations area and connect their own Google account to Bookablesites.
Once the Integration section is accessed, click on “Google Calendar“.
In that section, select “Connect Account,” and Bookablesites will redirect you to Google’s sign-in page, where you’ll choose the Google account to use. After you select the account, Google will display a notice explaining that you are granting Bookablesites permission to view and modify events on all calendars in that account, as well as to view and download any calendars you can access through Google Calendar.
To enable the Google Calendar integration, you must grant both requested permissions and then click “Continue,” as shown in the example.
After Bookablesites is authorized to access the Google account, you will be returned to the Account Settings > Integrations page, where the connection status will show as active. From there, you can:
- Add Another Account – An employee can connect several Google accounts so they can choose which calendars will block availability in Bookablesites. Up to six accounts can be linked.
- Sync with – Select one calendar from the connected accounts where all Bookablesites appointments will be created. Only one calendar can be chosen for syncing appointments.
- Block time from calendars – Choose one or more calendars whose busy times will prevent bookings in Bookablesites. You can add up to six calendars by clicking “Add Calendar.” For example, if you select both a work and a personal calendar, any busy times in either will be blocked in Bookablesites.
- Insert Pending Appointments – bBy default, when an employee connects their Google account, the global settings from the Google Calendar and Google Meet integration are not applied automatically. The employee must decide whether pending Bookablesites appointments should also be added to their Google Calendar.
- Include Buffer time in Google events – This setting is also independent of the global Google Calendar options. Each employee can choose whether buffer time will be included in the events Bookablesites creates.
- Event Title and Event Description – These fields do not inherit the global configuration either. The employee needs to define their own event title and description format here.
Be sure to save your changes when you are done
Google Meet
Google Meet must first be turned on at the global level under Features & Integrations > Google Calendar > Set Up. After it is activated there, Google Meet links will be automatically attached to new appointments.
Be sure to review each employee’s Working Hours and Service configuration to confirm that the service is offered online or across all locations; if not, Google Meet links will not be generated.
After opening the “Employees” section, click the three-dot menu next to the staff member you want to modify and choose “Edit Employee.” In the employee’s profile, you can update their default location and enable Google Meet for that employee.
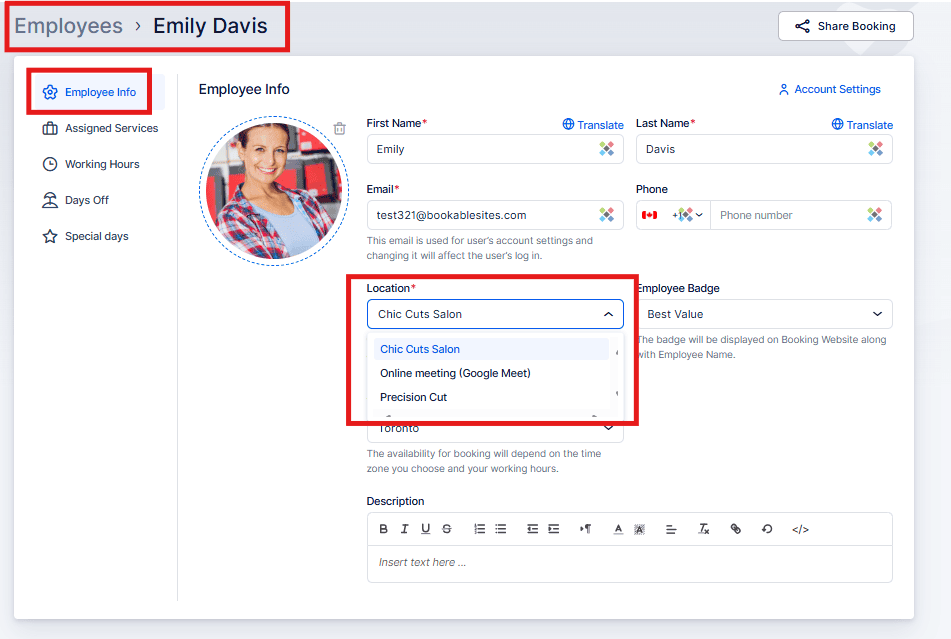
Keep in mind that setting Google Meet here does not automatically mean the employee is ready to be booked online. You still need to review their Working Hours and confirm where their services are available (Online, On-site, or All Locations).
Working Hours:
While viewing the employee’s profile, open the “Working Hours” tab and review their schedule. Because Working Hours are highly flexible, simply choosing Google Meet as the default location might not be sufficient if specific locations were manually set within the working hours. In that case, the custom locations defined in the schedule can override the default, as shown in the example screenshot below.
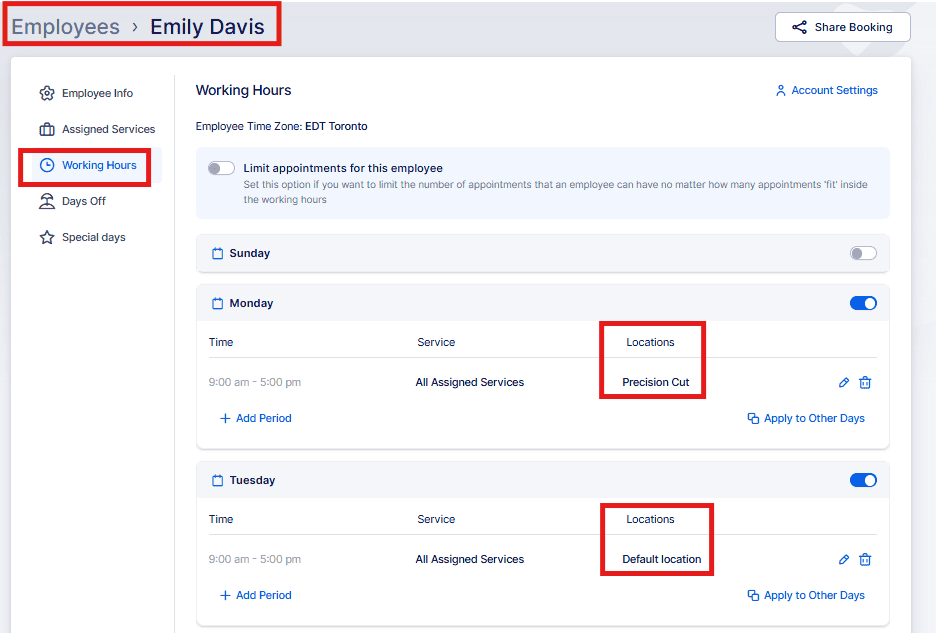
In this example, the employee uses the Default Location (Google Meet) on Tuesdays, while Monday is specifically set to the “Barbershop Salem” location. Keep in mind that you can assign multiple locations within an employee’s working hours and create several working periods so they can work at different locations in different time blocks.
After confirming that the employee’s Working Hours are set up properly, you can proceed to configure Services.
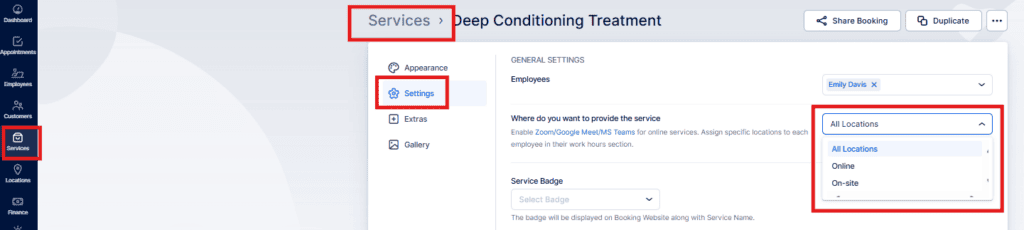
- Services:
Go to the Services section and open the service you want to make available through Google Meet. In the service details, navigate to the “Settings” tab on the left and look for the “Where do you want to provide the service” setting. Selecting “Online” or “All Locations” will allow this service to be scheduled with Google Meet. Choosing “On-Site” will prevent Google Meet links from being added to appointments for that service.
After confirming the employee’s working hours and that the service is available online, you can start using Google Meet.
When a new booking is created, a unique Google Meet link will be generated. Group bookings share a single Meet link for all participants. If “Send Event Invitation Email” is enabled in your global Google Calendar and Google Meet settings, customers can accept the invite and the event — including the Meet link and the event title and description from Bookablesites — will be added to their Google Calendar.
Common Scenarios & Troubleshooting
Scenario 1: Employee connected only via Features & Integrations but still receives double bookings Issue: The employee is linked through the admin (F&I) but only one calendar is synced. Other personal or work calendars with events aren’t blocking availability, causing overlaps.
Solution:
- Remove the connection from Features & Integrations.
- Have the employee connect via Account Settings > Integrations > Google Calendar.
Scenario 2: Overridden by employee” appears in Features & Integrations Issue: Admin sees this label when viewing an employee’s calendar status.
Meaning: The employee connected their Google account through Account Settings, so the admin cannot assign calendars via F&I.
Solution: If centralized calendar management is needed, ask the employee to disconnect their Account Settings integration first.
Scenario 3: Employee switching from admin‑managed to self‑managed connection Issue: The employee was connected via F&I but now needs access to multiple calendars.
Solution:
- Admin removes the F&I connection (click X next to the employee’s name).
- Employee reconnects via Account Settings and selects the required calendars.
Scenario 4: Admin sees “You are already connected” in Account Settings Issue: Admin attempts to connect via Account Settings but already has a calendar linked through F&I.
Solution:
- Disconnect from F&I first, then connect through Account Settings.
- Choose one connection method to avoid conflicts.
Scenario 5: Employee connected but events don’t appear in Google Calendar Issue: The connection exists, but new bookings are missing from Google Calendar.
Possible fixes:
- Verify the correct calendar is selected in Account Settings.
- Reconnect Google Calendar to refresh permissions.
- Confirm the integration is enabled under Features & Integrations for that employee.
Key Points to Remember
- The Google Calendar integration only blocks time in Bookablesites when the external event is marked as Busy. If a slot isn’t being blocked, confirm it’s pulled from the correct calendar and edit the Google event to ensure its status is Busy, not Free.
- If an employee is connected through the global Google Calendar integration (F&I), that connection cannot be overridden via Account Settings.
- Connecting multiple Google accounts is only supported through Account Settings.
- Only one Google Calendar can be designated to receive appointments created by Bookablesites, though up to six calendars may be chosen to block availability.
- Global Event Title and Event Description settings do not copy to an employee’s Account Settings; each employee must configure their own title and description formats.
- New appointments are added to the connected Google Calendar going forward (online or offline). This is not retroactive — existing bookings made before the connection won’t be added automatically. Because Bookablesites supports two‑way sync, opening and saving an appointment (without changes) will add it to Google Calendar.
- If an employee deletes the Google Calendar event created from a Bookablesites appointment, the appointment status will change to “Rejected” and trigger the “Appointment Rejected” notification (if enabled).
- If an employee moves the Google Calendar event created from a Bookablesites appointment, the appointment will be rescheduled in Bookablesites and the “Appointment Rescheduled” notifications will be sent (if enabled).
- Changes made in the admin area of Bookablesites will update the corresponding Google events.
- The Calendar section in Bookablesites can display Google Calendar events. Open Calendar, click the Options dropdown, and choose “Show Google Calendar Events” to view Google events (they show the Google Calendar icon in the corner).
- If Google Meet is enabled by an admin under Features & Integrations > Google Calendar > Set Up, it becomes available to all employees connected either via Account Settings or via Features & Integrations.