
Whenever a new customer (identified by a unique email) books via your site or is added from the admin dashboard, a customer record is automatically created and stored in the Customer Profiles area.
Creating Customers
Creating customers Bookablesites streamlines bookings by allowing clients to schedule services directly on your booking page. Each new front-end booking automatically adds that client to the Customers list in the admin dashboard. You can also add customers manually from the admin area when you need more control.
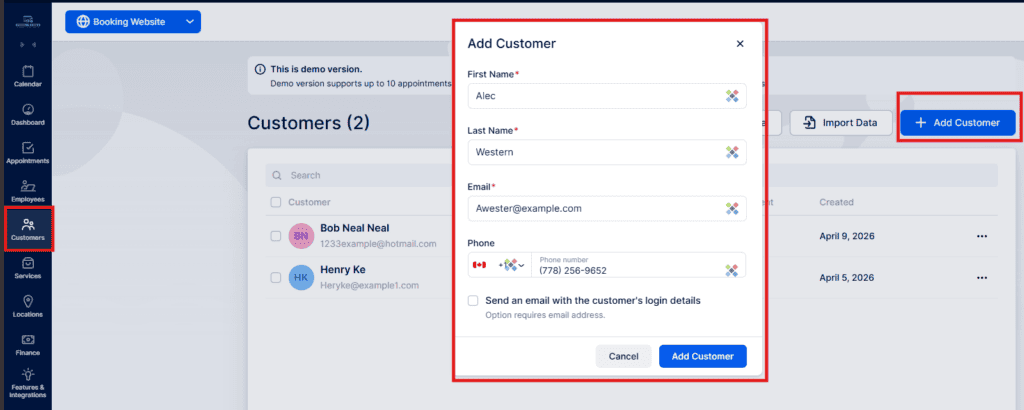
To add a customer manually, click + Add Customer. A popup will appear where you enter the customer’s information:
- First name / Last name: Required to create the profile.
- Email: Used for login and notifications; each email must be unique in Bookablesites. If the email is already in use, review existing profiles to resolve the conflict.
- Phone number: Optional. The default country code from General Settings is shown but can be changed by clicking the flag. Customers may also provide a phone number during booking.
- Send an email with login details: Enabling this will send the Login Link email template, allowing the customer to set their password via a provided link.
After filling in the fields, click Add Customer. If the entry is successful, a confirmation appears and you can either go directly to the customer’s profile or close the popup to return to the Customers list.
Selecting “Go to Customer” after creating a profile opens that customer’s detail page, where you can add more information. In addition to the basic fields, you can specify:
- Gender: Record the customer’s gender.
- Date of Birth: Enter the customer’s birth date.
- Customer Notes: Internal notes visible only to staff (e.g., allergies, preferences, special instructions)..
Below these fields is the Customer Custom Fields area. If custom fields already exist, they will be available in the dropdown after expanding this section. If none are set up yet, click “Go to Custom Fields” to create and assign customer-specific custom fields that match your requirements in Bookablesites.
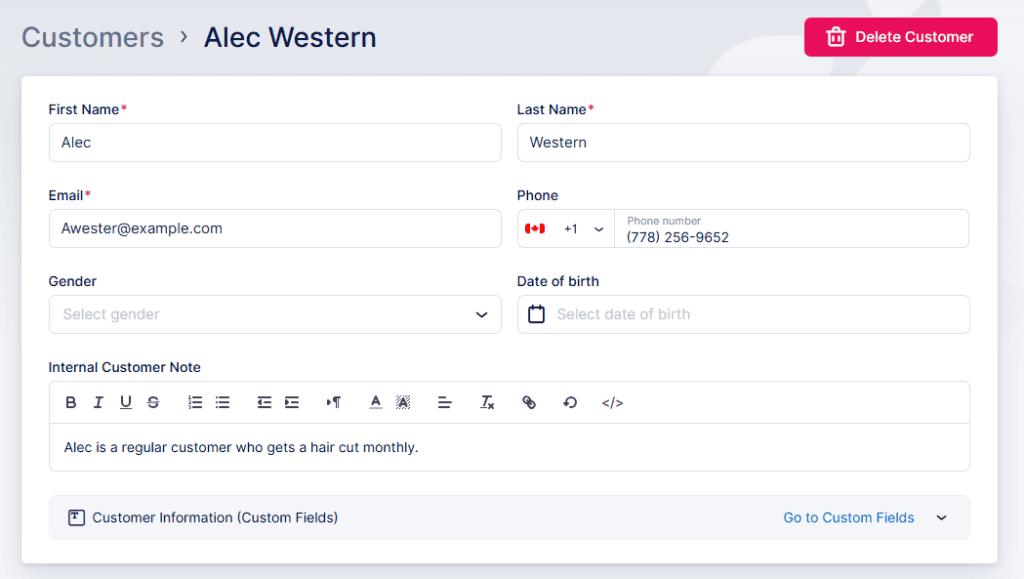
After entering all required details for a customer, be sure to click Save Changes to store their record and display it in the customer list.
Importing customers From the Customers area you can import an existing customer CSV via Import Data. Your file must follow these formatting rules:
- Omit a header row with column titles.
- Place First Name and Last Name in separate columns.
- Use the date format that matches your bookablesites General Settings.
- Include phone numbers with the “+” prefix and country code.
- Use “Male” or “Female” for the Gender column.
During import you’ll map CSV columns to bookablesites fields. Only map columns that correspond to customer fields in Bookablesites; choose “Don’t import” for any you want to skip.
Please note:
- Each Bookablesites field should be mapped only once to a single column.
- Required fields (First Name, Last Name, Email, and Phone if enabled) must be mapped.
- If an imported email matches an existing customer, you’ll be prompted to overwrite or skip that record.
Exporting customers Next to Import Data is Export Data, which lets you pick the CSV delimiter (comma or semicolon) and select which columns to export. All columns are selected by default.
Working With the Customers List
Customer list overview The Customers list provides a snapshot of each profile:
- Full name and email
- Total appointments booked
- Date of last appointment
- Date the profile was created
This view helps identify long-term customers and high-frequency bookers for loyalty or marketing efforts.
Actions and bulk operations:
- Bulk delete: Select records via checkboxes and use the Delete option above the list (a Select All checkbox is available). A confirmation is required; note that related bookings will also be removed.
- Search: Find customers by first name, last name, or email.
- Individual actions: The three-dot menu beside each customer offers Edit and Delete.
Customer Details Sidebar:
Clicking a customer opens a sidebar with additional insights:
- Most appointments with: Top three employees the customer books, with counts.
- Favorite services: The customer’s top three services from past bookings.
- Payments total: Aggregate amount the customer has paid; click View All Payments to open the Finance page and see itemized transactions.
Three-dot options in the sidebar:
- Edit or Delete customer
- Enable Login for the customer
- Block the customer
All of the above functions are available within Bookablesites to help you manage and analyze your customer base efficiently.
Block Customer
If a client is abusing your booking system or submitting fraudulent reservations, you can prevent them from making future bookings.
Requirements
- The customer must have an email address or phone number on file. Making email and/or phone mandatory helps enforce blocks.
How to block a customer:
- Open the Customers section.
- Locate the customer and open the three-dots menu.
- Choose Block Customer.
- Confirm by clicking Block in the confirmation popup.
How to unblock a customer:
- To lift a block, open the same three-dots menu for the blocked profile and select Unblock Customer.
Identifying Blocked Customers:
- Blocked profiles appear dimmed in the Customers list and their avatar is replaced with a crossed-out icon.
User Experience for Blocked Customers:
- Booking attempts: The system uses cookies to help prevent blocked users from booking again with a different email.
- Login attempts: Blocked users who try to sign in will see: “Sorry, logging into your account is currently unavailable. Please try again later.”
- Guest bookings: If a blocked user attempts a guest booking and clicks Book Now, they will see: “Apologies, booking is currently unavailable. Please try again later.”
Customer Panel
If you allow Only Registered Users or Both Registered and Guest Users to book, the booking site will display a Log In button in the top-right corner. Through the Customer Panel, users can:
- View current bookings
- See appointment details
- Reschedule or cancel appointments
- Manage profile settings, including updating details and changing passwords
For full details about the Customer Panel, consult the dedicated documentation in Bookablesites. here.