
Locations -The Sites feature in Bookablesites is built for businesses operating across different locations. The ability to have multiple sites is a specialized feature in Bookablesites, which is activated by default during your trial period.
nitially, Bookablesites begins with one site, which can be utilized for businesses operating from one place. If your business is web-based or you deliver services at a single location, there’s no need to worry. You can use Bookablesites without setting up multiple locations. Simply input your organization’s address in the Company Settings, and it will function as the sole location for your business.
Bookablesites also accommodates Zoom, Microsoft Teams, and Google Meet as virtual sites. However, if you need multiple physical sites, this guide will walk you through establishing and managing multiple sites within the Bookablesites booking platform.
The Locations feature for Bookablesites is regarded as a premium capability, and it will be included in your total count of Custom Features & Integrations.
During your Free Trial period, the “Locations” feature will be automatically enabled. For current users who need to enable this capability, follow these instructions:
- Navigate to the Features & Integrations area.
- Find the “Multiple Locations” card.
- Select “Enable”. The card will update, showing the “Disable” button once activated. This confirms that the capability is now ready for use and will display in the left-side navigation.
Note: If you have set up Google Meet integration, Zoom integration, and/or Microsoft Teams Integration, these will already be included. The “Locations” button will be accessible in the left-hand side navigation. These virtual sites cannot be modified or deleted as they are utilized to deliver services by default.
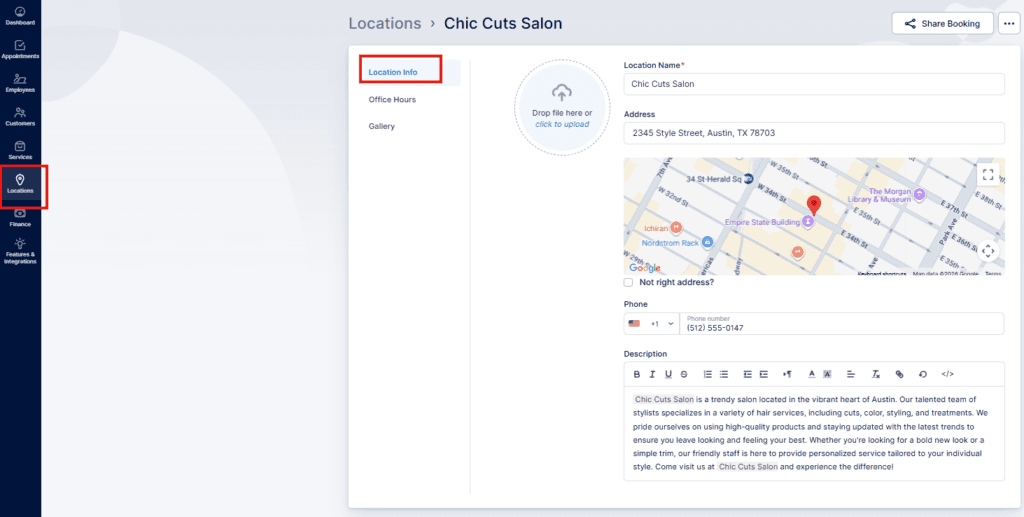
Once you access the Locations section, you’ll be able to establish your first location. Begin by selecting the “+ Add Location”. This will open a popup window where you can configure the site by filling in the provided options and fields:
- Image: Upload the photo of the location. This will assist your clients in identifying the location, but it can also serve a descriptive function. You can select the circle to upload the photo, or you can simply drag it and drop it into the circle.
- Name (mandatory): Provide the name of the location. For example “Johny’s Barbershop, St. Louis”.
- Address: Provide the address of the location. When you start typing the address, Google Maps will show you suggestions, so you can simply select the correct location once it appears. The map below should position the marker on the correct location, but you can move it to the correct location if it doesn’t work. Below the map, you can also check the “Not right address?” checkbox, which will give you two additional fields, where you can input the exact latitude and longitude of your location.
- Pin: In the dropdown, you’ll be able to choose the marker color and you can select from 8 different colors currently.
- Phone: Input the contact number of the site.
- Description: Enter a brief overview of the location and the services that are provided there.
After the site has been created, a “Success” message will appear, and you’ll have the choice to simply dismiss it, or to navigate to additional configurations of the site by selecting the “Go to Location” button.
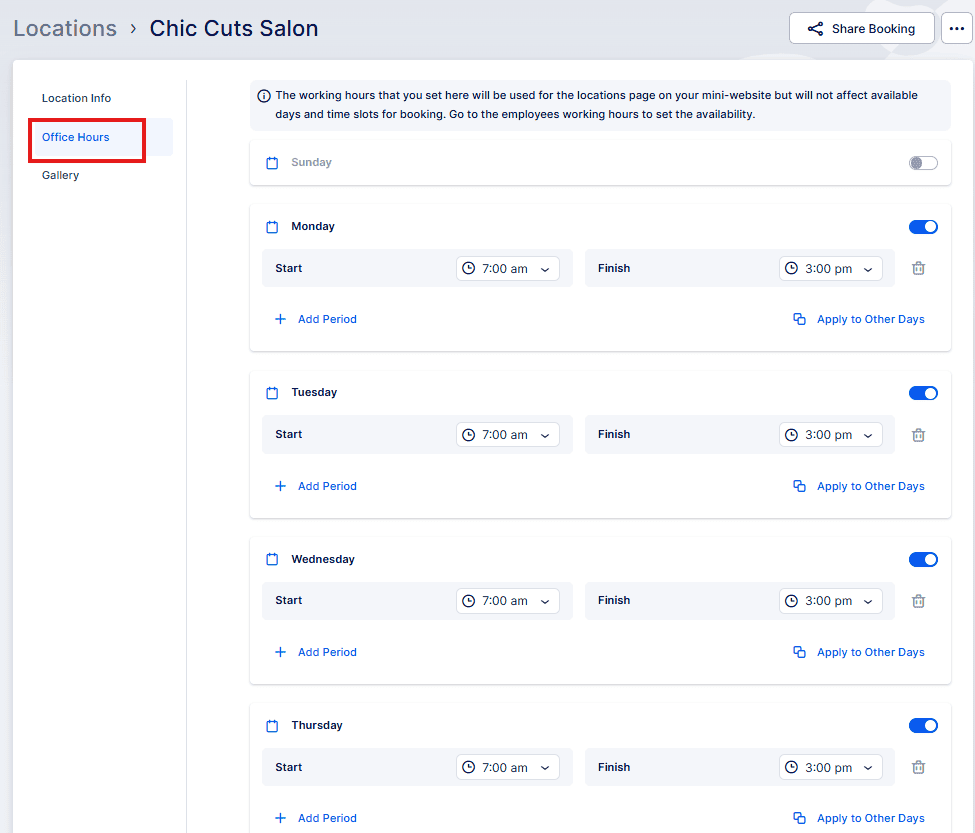
If you use this button, Bookablesites will direct you to the comprehensive view of the site where you’ll be able to review and update the information you provided when you created the site, but you’ll also notice two sections on the left:
- Office Hours
- Gallery
The Office Hours section enables you to establish the site’s business hours, which will be shown on the location’s page of your mini-website. These business hours are intended to display when the site is open but do not directly impact the availability of services.
To set up the availability of services, you will need to modify the Employee’s Working Hours.This allows you to specify which site(s) the staff member will service during their working hours. By coordinating staff schedules with particular locations, you ensure that services are available and bookable at the appropriate times and places.
The Gallery section allows you to improve the site’s profile by including a collection of images related to the site. These images will be presented to clients during their booking process once they choose the location.
To add images to the gallery:
- Select the field for uploading photos.
- Upload images from your files to create an attractive visual presentation of the location.
Once you have completed entering all location details, remember to select the “Save Changes” button that appears at the bottom of the screen. This ensures that the location information is preserved and shown correctly on the page for clients to view and choose.
Please Note:
- In order for the locations to display during the booking process, you need to link them with employees in the Employee’s Info and Working Hours sections.
- Select the default location for each employee. Additionally, choose the specific locations for each working period to establish unique schedules.
- Your staff members can work at different locations, so Bookablesites provides the flexibility to assign different sites for different working periods.
Working with the Locations list
All Locations are displayed on the Locations page, showing basic information such as the location name, address, and phone number. Selecting a specific location will open a sidebar with more comprehensive information.
Sidebar Details:
- Office Hours: View the business hours of the site.
- Address: The address is shown on a map for convenient reference.
- Gallery: If established, a collection of images related to the site.
To modify a location, simply click on the “Edit” button at the top of the right-hand side panel.
If you have an extensive list of locations, you can search for a particular location by typing its name.
Each location has a three-dots (…) menu on the right of the page, enabling you to:
- Edit: Make modifications to the location details.
- Delete: Remove the location from the list.
Note:
If you try to delete a location that has past or future appointments linked to it, a warning will be displayed to prevent accidental removal.
IIf you decide to delete a site with scheduled appointments, all future and past appointments associated with that site will also be removed.
This action is permanent and cannot be reversed.
On your Booking Platform, clients will find the “Locations” tab at the top. When they select it, they will be able to view all physical locations (online locations will not be displayed):