
The main approach for sending notifications in Bookablesites is via Email Notifications. These alerts are crucial for keeping both clients and staff informed about different updates including fresh bookings, modified appointments, cancellations, and rejections, along with booking reminders and follow-up messages.
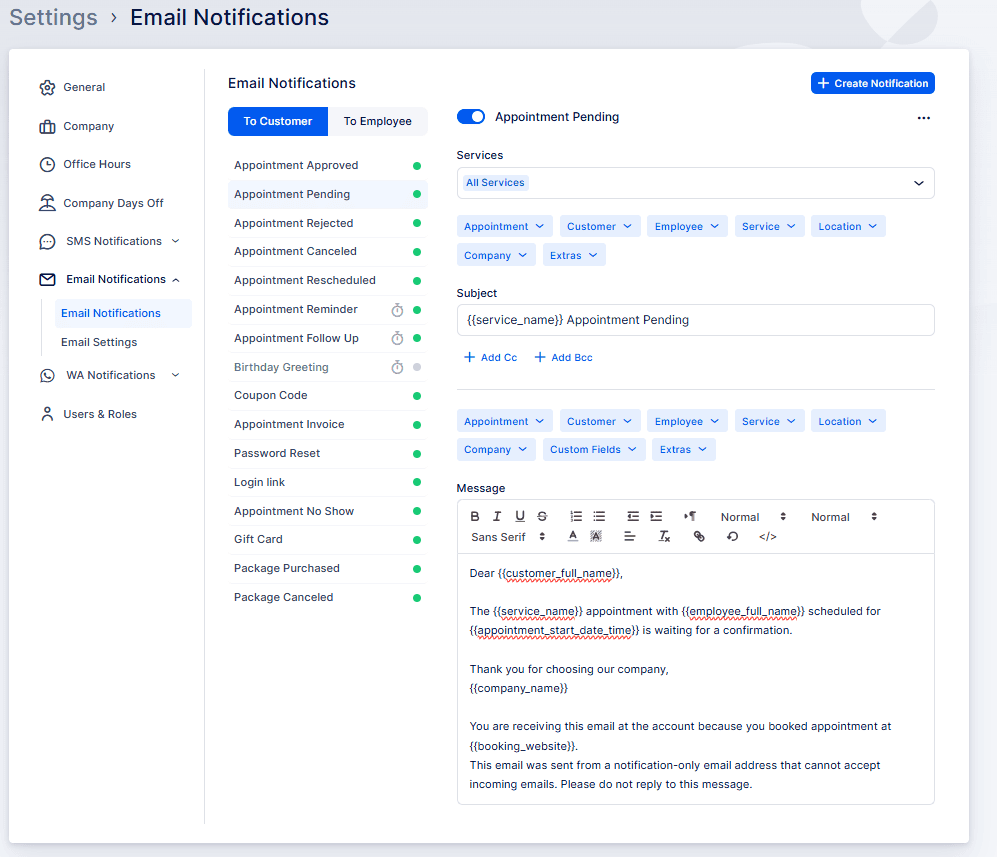
To reach the Email Notification templates, go to the “Settings” tab located in the bottom left corner. Next, open the Email Notifications section and click on “Email Notifications“. This will direct you straight to the templates designed for client notification
Bookablesites offers two categories of email notifications:
- Event-driven notifications: These alerts activate when particular actions occur. The events encompass “Appointment Booked”, “Appointment Rejected”, “Appointment Canceled”, “Appointment Status Changed”, and “Appointment Rescheduled”.
- Scheduled notifications: These alerts activate according to predetermined timing before or after an appointment. The scheduled encompass Reminder and Follow-up email templates.
Every email template in bookablesites permits you to include up to 3 Cc and 3 Bcc email addresses, guaranteeing these additional recipients receive the emails.
Initially, all templates are active except the Birthday Greeting template. Nevertheless, you can deactivate any template you prefer not to send. Just click on a template and locate the toggle switch beside the template title (positioned above the Subject line).
Six notification templates are common to both Customers and Employees. These templates require individual configuration to guarantee appropriate emails reach the correct recipients:
- Appointment Approved
- Appointment Pending
- Appointment Rejected
- Appointment Canceled
- Appointment Rescheduled
- Appointment Reminder
Furthermore, standard notification templates for Customers encompass:
- Appointment Follow Up
- Birthday Greeting
- Coupon Code
- Appointment Invoice
- Password Reset
- Login link
- Appointment No Show
For Employees, standard notification templates encompass:
- Password Reset
- Login Password
- Login Link
We will explore each of these notification categories comprehensively below.
Below the subject line, you can include Cc (Carbon Copy) and/or Bcc (Blind Carbon Copy) email addresses. This functionality enables other team members in your organization to receive emails that are automatically distributed by bookablesites.
You may include up to 3 additional email addresses for both Cc and Bcc sections, making a total of 6 email addresses. To include multiple addresses, enter each email address individually and press ENTER following each entry.
Important note: if you desire to establish additional notifications and customize them further according to your requirements, you can activate the Custom Notifications feature.
Appointment Approved
This template will be sent when the appointment status is set to “Approved”. To guarantee this template sends immediately following the booking completion, the Default Appointment Status in the General Settings of Bookablesites must be configured to “Approved”. If the default status is set to “Pending”, this notification sends after manually changing the appointment’s status to Approved on the Appointments page.
This notification is available for both customers and employees, but it can be disabled by toggling the button above the Subject of the template.
Appointment Pending
If the Default Appointment Status in General Settings is set to Pending, this notification sends immediately upon booking completion. Similar to the Appointment Approved notification, this applies to both customers and staff members. You can switch the slider above the template’s Subject to deactivate it when necessary.
Appointment Rejected
This template functions to notify customers and staff members that the booking has been rejected.
Changing the status of the appointment to “Rejected” in the Appointments section will automatically activate this notification (when enabled) for both the customer and the employee.
Appointment Canceled
The Appointment Canceled email template is slightly different from the “Appointment Rejected” template. Customers can cancel their appointments in two ways: (1) by using the appointment cancellation placeholders added to the “Appointment Approved” and/or “Appointment Pending” email templates, or (2) through their customer profile if they are a registered user with access to log into their profile on your Booking Website. When a customer cancels their appointment, this notification will be sent to the customer and the employee (if both are enabled).
Additionally, you can also cancel an appointment from the Appointments section by modifying its status. The reason for maintaining this status in the back-end is to distinguish between a declined appointment, which may result from previous customer conduct, and a cancelled appointment, which might happen due to unexpected circumstances such as a staff member becoming ill and no one being available to cover the appointment.
Ultimately, selecting the status in the back-end and the content and activation of these templates remains your decision.
Appointment Rescheduled
The Appointment Rescheduled notification activates when you modify the date and/or time of an appointment.
Customers can also reschedule their appointments using the appointment rescheduling placeholders in the “Appointment Approved” and/or “Appointment Pending” email templates. Additionally, registered customers can reschedule by accessing their customer profiles on your Booking Website.
Appointment Reminder
This represents a standard notification template created to remind your customers and staff members about approaching bookings, which can substantially decrease no-shows.
Under the template’s Subject, you’ll find the “Before Appointment” drop-down menu where you can select how long before the appointment this notification will be sent. Initially, it’s configured to “1 day”. For instance, when a booking is scheduled for December 2nd at 12:00, this email sends on December 1st at 12:00.
The minimum interval is “30 minutes” and the maximum interval is “1 week” before the appointment.
Appointment Follow Up
The Appointment Follow Up template serves to contact customers following their bookings. This email can fulfill various objectives, such as expressing gratitude to customers for selecting your business, supplying additional information, inviting them for future services, or politely requesting a positive review. Using this template can substantially improve customer retention rates.
Below the Subject line, you’ll find the “After Appointment” option where you can choose when the email sends after the appointment ends. The intervals range from “30 minutes” to “1 week” after the appointment.
This represents the first standard email template exclusively for customers. To also send a follow-up email to your staff members, you can activate the Custom Notifications feature and configure a new notification for them.
Birthday Greeting
The Birthday Greeting notification starts disabled, requiring you to activate it by switching the slider beside the template title.
This notification exclusively serves customers and primarily sends birthday wishes along with any special promotions you might offer for their special day.
To activate this email, customers must complete their Date of Birth in their profile. Below the Subject line, you’ll locate the “Scheduled For” dropdown where you can establish the time of day when the email sends on a customer’s birthday.
Coupon Code
The Coupon Code notification activates when you select the “Send to Customer” option beside each discount created on the Coupons Page. This email notification enables you to participate in email marketing by providing discounts to your valued customers when they book your services.
Appointment Invoice
The Appointment Invoice notification activates when you select the “Send Invoice” option beside each created invoice on th Invoice page. This email notification assists you in tailoring email messages for sending invoices to your customers.
Password Reset
The Password Reset notification enables you to personalize password recovery emails for both customers and and employees with various customizations. This email notification helps you customize email messages for sending invoices to your customers.
Password Reset
This template sends when the customer selects the “Forgot Password” option when attempting to log into their profile either through the booking process, or in the front-end Customer Panel.
Login Link/Login Password
These two notifications fulfill different roles in inviting users to access their accounts. The “Login Link” template applies to both customers and staff members. It invites the user to establish a password by visiting a link included in the email
Conversely, the “Login Password” notification specifically serves staff members. It provides the user with the password that was set when enabling login for the employee.
Appointment No Show
The “No Show” template activates when an appointment status is changed to “No-Show”. This status can only be established after the appointment’s scheduled start time has elapsed. When a customer misses their appointments, changing the status will automatically send this template to the customer. It’s created to inquire about the reasons for missing the booking. Like all templates, you have the flexibility to customize the content according to your requirements.
Testing the Email Templates
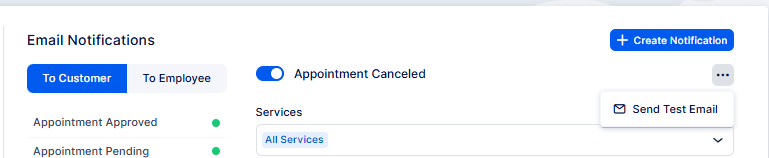
Each email template can be tested to preview its appearance for your customers. Simply select the three-dots menu in the top right corner of the template editor, then choose “Send Test Email”.
Please note that test emails will not process auto-generated placeholders (such as Zoom links, Google Meet links, Microsoft Teams links, Zoom Meeting links, etc.), so seeing a placeholder in the test email is expected.
It’s important to understand that test emails are automatically sent to your own email address and cannot be redirected to another email. Additionally, any Cc and Bcc email addresses added to the template will not receive these test emails.
Using Placeholders in Email Notification Templates
Each of these notifications provides options above the email body where you can select and insert email placeholders. Position your cursor in the template where you wish to insert a new placeholder, access any of the dropdown menus, and select the placeholder you require.
The placeholder will be automatically inserted into the template. You can insert as many as needed. All these placeholders will be substituted with actual data from bookings, services, staff members, locations, company information, etc. However, if there is no available data for that placeholder, then the placeholder will be substituted with a blank space.
After you complete configuring all email templates – remember to click “Save Settings“.
Incorporating the Reschedule Link in Notification Templates
You can allow your customers to reschedule the appointment directly from one of the notifications that they receive, by adding the “Reschedule Link” placeholder, which can be found in the Appointment dropdown. This placeholder will be replaced by a link in your notifications, which will redirect your customers to choose the new date and time for their appointment, after which the appointment will be rescheduled.
There are two available placeholders: {{appointment_reschedule_link_short}} which will send out a shortened link for rescheduling, and {{appointment_reschedule_link}} which will send out a full-length link for rescheduling.
Incorporating the Cancellation Link in Notification Templates
If you want to allow your customers to cancel the appointment directly from one of the notifications that they receive, you can add either the “Cancel Link“, or the “Cancel Link Short” placeholder, which you can find in the Appointment dropdown. These placeholders will be substituted by a link in your notifications so that your customers can click on it and their appointments will be cancelled.
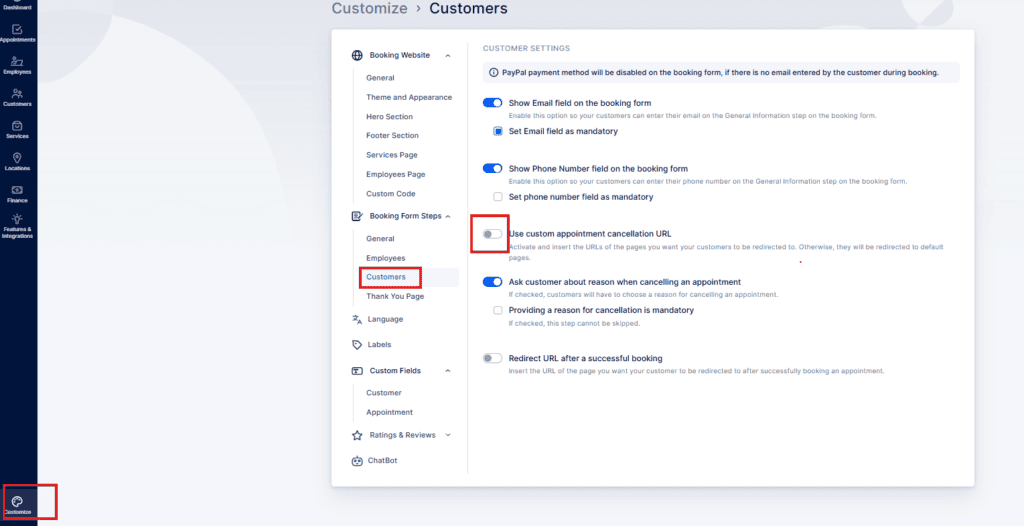
You can also configure the redirect pages, where the customer will be directed after clicking on the cancellation link. To configure this, you need to access the Customize section, activate the “Use custom appointment cancellation URL” option, and input the URL link for a page they will be directed to if their cancellation is successful and the URL link for a page they will be directed to if their cancellation is unsuccessful.
If you prefer not to configure these pages, and you leave the option deactivated, your customers will be guided to dedicated pages on your booking website that confirm either a successful or unsuccessful cancellation.
“Reply to” option
Customers can respond to emails sent from Bookablesites, so we’ve incorporated the feature where administrators will be able to include an email address for responses. If your customers want to inquire about something or modify some information, they will send it directly to your email address after they receive the email(s) you activated in the settings as automated notifications.
By default “Set email for replies” is deactivated. When you activate it, you need to input the email address that the customer’s replies will be directed to.
Custom Notifications
Beyond the standard Email and SMS Notifications included in your Bookablesites account, you have the ability to develop custom notifications designed specifically for your business requirements. These custom notifications can be set up for your employees or customers, enabling you to determine when they are dispatched and for which services they are applicable. This functionality allows you to personalize your communication with customers and promote better communication among your team members.
The Custom Notifications functionality for Bookablesites is regarded as a premium feature, and it will be calculated towards your total number of Custom Features & Integrations.
After enabling the Custom Notifications functionality on the Features & Integrations page, when you click on the ‘Set Up’ button, you’ll be taken to the Email Notifications section where you’ll discover a new button “+Create Notification” in the top right corner. It’s important to note that enabling this functionality will also activate the same option on the SMS Notifications page, permitting you to develop custom notifications for both Email and SMS.
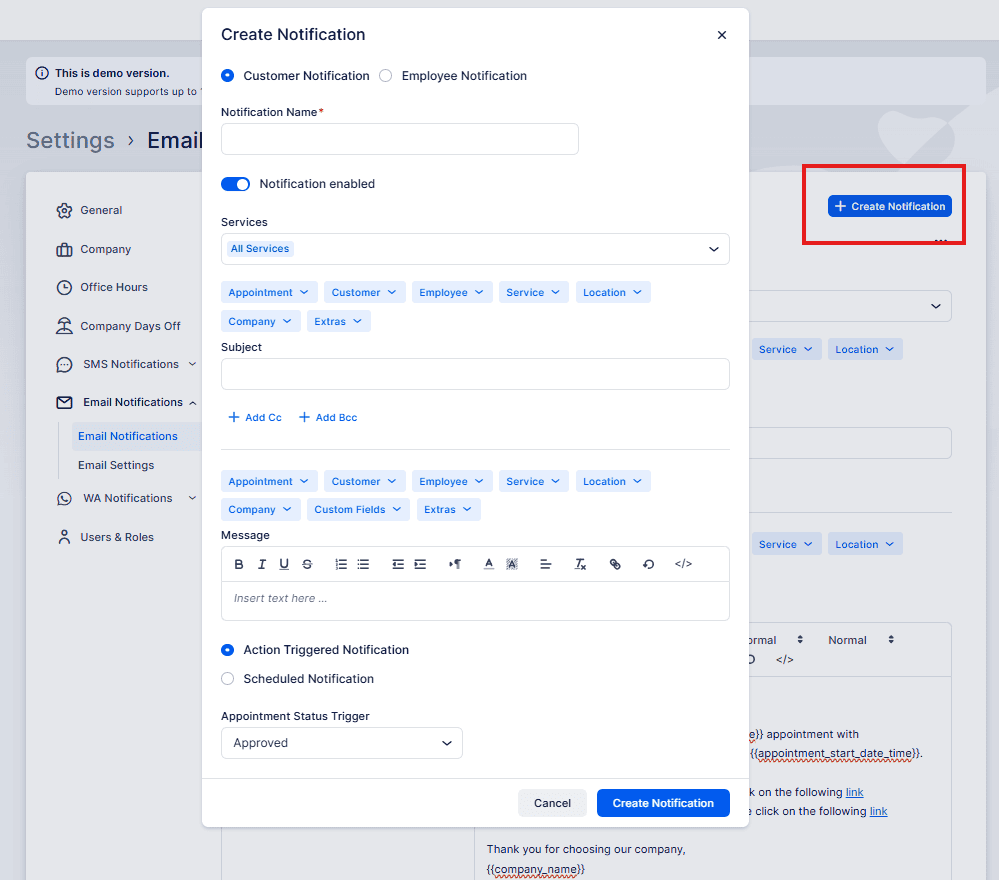
Clicking on the “+Create Notification” button will launch a new module where you can set up your notification by establishing the following options:
- Customer/Employee Notification: Select whether the notification will be dispatched to customers or employees.
- Notification Name: Input a name for the notification, which will help you recognize it among your other notifications.
- Notification enabled: Switch this on to enable the notification. You can deactivate it later if required.
- Services: Choose the particular services for which this notification should be dispatched.
- Subject: Input the subject line for the email notification.
- Message: Create the message that will be dispatched, including placeholders for booking-specific information.
- Action Triggered Notifications: If chosen, specify an event that activates the notification, such as a modification in appointment status. Choose the trigger status from the “Appointment Status Trigger” dropdown.
- Scheduled Notifications: If chosen, establish a particular time for the notification to be dispatched, relative to the appointment time. In the “Schedule” dropdown, select whether the notification should be dispatched before or after the appointment. Then, in the “Choose when” dropdown, specify the time interval (minutes, hours, days, weeks, months) before or after the appointment for the notification to be dispatched.
After you’ve set up these options, click “Save” to preserve your custom notification settings. You can always return to this section to modify or remove your custom notifications as required. This functionality provides flexibility in customizing your communication with customers and staff based on your particular business requirements.
Following your click on “Create Notification,” your notification will be preserved and distributed based on the configurations you’ve established. You’ll locate your notification displayed alongside all other notifications within either the “To Customer” or “To Employee” section, depending on your selection.
You can modify the notification by selecting it, even after its creation. This enables you to adjust its configurations or deactivate it when necessary.