
If you’ve already acquired a custom domain for your business and want your Bookablesites booking page to appear under that domain, you can easily replace the default ‘bookablesites.com’ URL with your own personalized web address.
The Custom Domain option in Bookablesites is a premium feature and is included in your total count of Custom Features & Integrations.
Enabling the Custom Domain feature
To set this up, go to the Features & Integrations section of your dashboard, locate the Custom Domain option, and click Enable to begin configuring your domain settings.
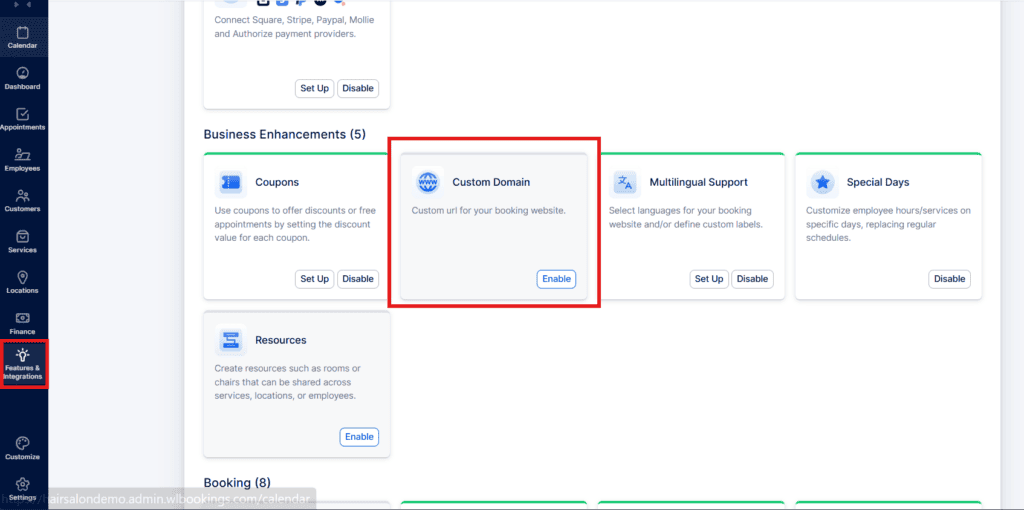
Once the feature is activated, the card will update to display a “Set Up” button. If you decide to turn off the custom domain later, the button will switch to show “Disable.”
Select “Set Up” to open the Custom Domain setup page.
A new screen will appear with step-by-step instructions on how to connect your domain to Bookablesites. Just follow the outlined steps to complete the setup process.
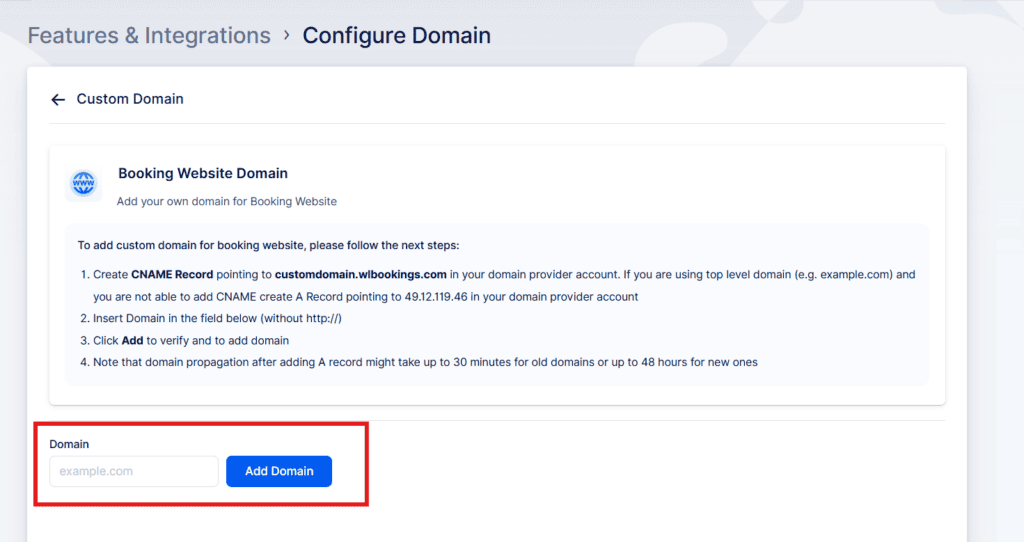
CNAME records use a domain prefix—such as “book” or “shop”—to link your domain to another domain name. For example, when someone visits book.yourdomain.com, they’ll be directed to the address defined in the CNAME record, which in this case would be your Bookablesites booking page.
To create a CNAME record, set it to point to customdomain.wlbookings.com. Bookablesites will automatically generate the correct URL for your booking site, so you simply need to copy it and add it to your hosting provider’s DNS settings.
A records (Address Records) are the core type of DNS record and map a domain name to a specific IP address.
If you’re connecting a subdomain directly to an IP address, create an A record that points to 49.12.119.46, as shown in the example above.
For more guidance, you can refer to GoDaddy’s documentation on adding a custom domain.
Once you set up either a CNAME or an A record, return to Bookablesites’ Custom Domain settings, paste your custom domain into the field provided, and click “Add Domain.”
After you see the “Success” message, open your booking page in Bookablesites (use the “Booking Website” button in the top-left). You’ll notice it now uses the new URL you configured.
Notes:
- If you’re using Cloudflare, turn off the proxy. Set both A and CNAME DNS records to “No Proxy.”
- Do not create DNS records for “www.” They are not required for Bookablesites’ custom domain setup.